An increasing number of developers work using several monitors simultaneously. But a multi-monitor system entails additional overhead when taking screenshots.
There are many tools for taking single- and multi-monitor screenshots on Windows systems. However, if you need to implement this feature in your application, here is how you can do this.
In this article, we discuss how to create a screenshot with two or more monitors in order to generate a single image and how to splice screenshots from several displays into one virtual screen-size bitmap using the Windows Graphics Device Interface functions, which are a group of WinAPI functions for working with graphics.
We’ll start with describing the process of taking screenshots of all monitors in multi-monitor mode and locating them in one bitmap programmatically, keeping the arrangement of monitors on the virtual screen. For these purposes, we’ll use the Windows GDI functions. But first, let’s explore the nature of virtual screens.
What is a virtual screen?
A virtual screen is a bounding rectangle that contains the images of several monitors. When you work in multi-monitor mode, the desktop covers the virtual screen instead of a single monitor.
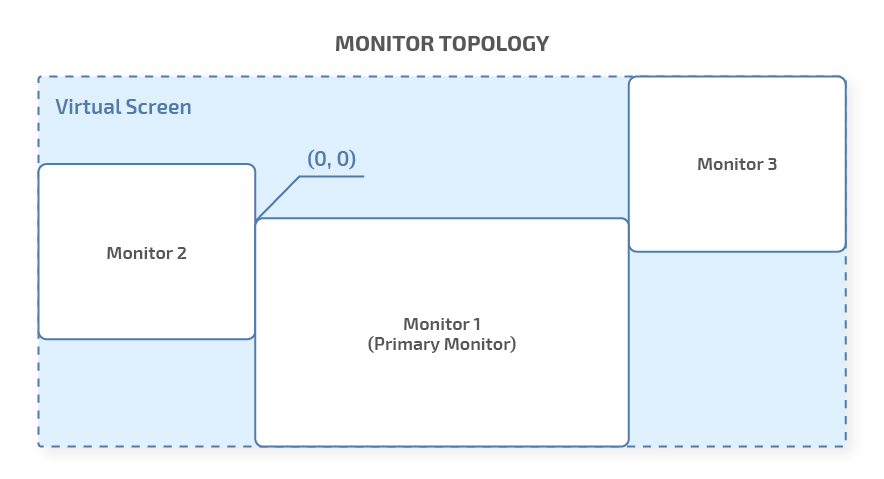
The following figure shows a possible arrangement of three monitors into a single virtual screen:

Figure 1. A virtual screen containing three monitors
The primary monitor (Monitor 1) contains the origin (0,0). If the primary monitor is not in the upper left corner of the virtual screen, parts of the virtual screen will have negative coordinates. As the monitor arrangement is set by the user, developers should make their applications able to work with negative coordinates.
Now let’s see how you can efficiently take a screenshot of the primary monitor with the help of Windows GDI functions.
Want to customize your C/C++ application with unusual features?
Entrust this task to seasoned Apriorit developers. With our 20+ years of development experience, we can build a feature of any complexity for you.
Taking a screenshot of the primary desktop
Taking a screenshot of the primary monitor is a well-known task that has a rather simple implementation. But let’s take a look at it anyway, since we’ll need to do this later when we take screenshots of all monitors.
To capture the primary monitor, we execute the Windows GDI function CaptureDesktop:
void CaptureDesktop(CDCGuard &desktopGuard      // handle to entire device context (DC)
                    , CDCGuard &captureGuard    // handle to destination DC
                    , CBitMapGuard & bmpGuard   // handle to BITMAP
                    , HGDIOBJ & originalBmp     // handle to GDIOBJ
                    , int * width
                    , int * height
                    , int left
                    , int top);
This function assumes we already have a handle to monitor the device context (DC) — CDCGuard &desktopGuard in the parameters list. To get the device context for the entire screen, we use the GetDC function:
HDC hDesktopDC = GetDC(NULL);Other handles (captureGuard and bmpGuard) are out parameters. We’ll use them for creating the bitmap file with the BITMAPFILEHEADER property.
CDCGuard is a class-wrapper that deletes the handle to the device context in its destructor:
class CDCGuard
{
    HDC h_;
    CDCGuard(const CDCGuard&);
    CDCGuard& operator=(CDCGuard&);
public:
    explicit CDCGuard(HDC h)
        :h_(h){}
        ~CDCGuard(void)
        {
            if(h_)DeleteDC(h_);
        }
        void reset(HDC h)
        {
            if(h_ == h)
                return;
            if(h_)DeleteDC(h_);
            h_ = h;
        }
        void release()
        {
            h_ = 0;
        }
        HDC get()
        {
                return h_;
        }
};
CBitmapGuard is also a class wrapper and has a similar implementation, but it deletes the HBITMAP object in its destructor:
class CBitMapGuard
{
    HBITMAP h_;
public:
        ~CBitMapGuard(void)
        {
            if(h_)DeleteObject(h_);
        }
// other methods
}
The final function for capturing a screenshot of the primary monitor looks like this:
void CaptureDesktop(CDCGuard &desktopGuard  // handle to monitor DC
                              , CDCGuard &captureGuard  // handle to destination DC
                              , CBitMapGuard & bmpGuard  // handle to BITMAP
                              , HGDIOBJ & originalBmp      // handle to GDIOBJ
                              , int * width
                              , int * height
                              , int left
                              , int top)
{
    unsigned int nScreenWidth=GetDeviceCaps(desktopGuard.get(),HORZRES);
    unsigned int nScreenHeight=GetDeviceCaps(desktopGuard.get(),VERTRES);
    *height = nScreenHeight;
    *width = nScreenWidth;

    // Creating a memory device context (DC) compatible with the specified device
    HDC hCaptureDC = CreateCompatibleDC(desktopGuard.get());
    if (!hCaptureDC)
    {
        throw std::runtime_error("CaptureDesktop: CreateCompatibleDC failed");
    }
    captureGuard.reset(hCaptureDC);

    // Creating a bitmap compatible with the device
    // that is associated with the specified DC
    HBITMAP hCaptureBmp = CreateCompatibleBitmap
  (desktopGuard.get(), nScreenWidth, nScreenHeight);
    if(!hCaptureBmp)
    {
        throw std::runtime_error("CaptureDesktop: CreateCompatibleBitmap failed");
    }
    bmpGuard.reset(hCaptureBmp);

    // Selecting an object for the specified DC
    originalBmp = SelectObject(hCaptureDC, hCaptureBmp);
    if (!originalBmp || (originalBmp == (HBITMAP)GDI_ERROR))
    {
        throw std::runtime_error("CaptureDesktop: SelectObject failed");
    }

    // Blitting the contents of the Desktop DC into the created compatible DC
    if (!BitBlt(hCaptureDC, 0, 0, nScreenWidth, nScreenHeight,
    desktopGuard.get(), left, top, SRCCOPY|CAPTUREBLT))
    {
        throw std::runtime_error("CaptureDesktop: BitBlt failed"
    );
    }
}
Now that you know how to take a screenshot of just one monitor, let’s take a look at how to take a screenshot with two monitors.
Read also
How to Take Multi-monitor Screenshots on Linux Using the Xlib and XCB Libraries
Need multi-monitor screenshot support in your Linux software? Learn the step-by-step process for building your own screenshot tool that can save screenshots in BMP format.
Taking a single screenshot from multiple desktops
To make a single screen capture with dual monitors, we have to get the DC from each monitor on the virtual screen, then capture its contents. To do this, take the following steps:
- Enumerate monitors using the EnumDisplayMonitors function.
- Take a screenshot of each enumerated monitor using the CaptureDesktop function.
- Splice the screenshots of all monitors into a single virtual screen-sized GDI bitmap.
The declaration of the EnumDisplayMonitors Windows GDI function is the following:
BOOL EnumDisplayMonitors(
  HDC hdc,                  // handle to display DC
  LPCRECT lprcClip,         // clipping rectangle
  MONITORENUMPROC lpfnEnum,   // callback function
  LPARAM dwData             // data for callback function
);
In the code above, LPARAM dwData is a pointer to the class encapsulating the list of pairs of handles to the monitors’ display contexts and corresponding coordinates (the RECT structure):
typedef std::vector<std::pair<HDC, RECT>> HDCPoolType;The EnumDisplayMonitors function is called in its constructor. The CDisplayHandlesPool class provides the EnumDisplayMonitors method with the context for the discovered data storage with the help of HDCPoolType for the purposes of safety and convenience:
class CDisplayHandlesPool
{
private:
    HDCPoolType m_hdcPool;

public:
    typedef HDCPoolType::iterator iterator;

    CDisplayHandlesPool()
    {
        guards::CDCGuard captureGuard(0);
        HDC hDesktopDC = GetDC(NULL);
        if (!hDesktopDC)
        {
            throw std::runtime_error("CDisplayHandlesPool: GetDC failed");
        }
        guards::CDCGuard desktopGuard(hDesktopDC);

        if(!EnumDisplayMonitors(hDesktopDC, NULL, MonitorEnumProc,
        reinterpret_cast<lparam>(this)))
        {
            throw std::runtime_error
      ("CDisplayHandlesPool: EnumDisplayMonitors failed");
        }
    }

        // Other methods

};
</lparam>
In the code above, MonitorEnumProc is a callback function:
BOOL CALLBACK MonitorEnumProc(
  HMONITOR hMonitor,  // handle to display monitor
  HDC hdcMonitor,     // handle to monitor DC
  LPRECT lprcMonitor,   // monitor intersection rectangle
  LPARAM dwData       // data
)
{
    CBitMapGuard bmpGuard(0);
    HGDIOBJ originalBmp = NULL;
    int height = 0;
    int width = 0;
    CDCGuard desktopGuard(hdcMonitor);
    CDCGuard captureGuard(0);

    CaptureDesktop(desktopGuard, captureGuard, bmpGuard,
  originalBmp, &width, &height, lprcMonitor->left, lprcMonitor->top);

    RECT rect = *lprcMonitor;
    ScreenShooter::CDisplayHandlesPool * hdcPool =
  reinterpret_cast<screenshooter::cdisplayhandlespool>(dwData);
    hdcPool->AddHdcToPool(captureGuard, rect);
    return true;
}
</screenshooter::cdisplayhandlespool>
Related project
Developing a Custom ICAP Server for Traffic Filtering and Analysis
Discover how our team helped a leading cybersecurity provider implement a C++ ICAP server, enabling seamless file sanitization and service delivery through proxy servers. This solution not only strengthened their product but also expanded their customer base and boosted revenue.
Now, all we need to do is merge the captures of all monitors into a single virtual screen-sized bitmap. To create the Windows GDI bitmap, the SpliceImages function follows the same algorithm as the CaptureDesktop function. Then we have to copy data from the defined DC to the same DC of the virtual screen using the BitBlt function.
void SpliceImages( ScreenShooter::CDisplayHandlesPool * pHdcPool
                        , CDCGuard &captureGuard
                        , CBitMapGuard & bmpGuard
                        , HGDIOBJ & originalBmp
                        , int * width
                        , int * height )
{
    HDC hDesktopDC = GetDC(NULL);
    CDCGuard desktopGuard(hDesktopDC);

    unsigned int nScreenWidth = GetSystemMetrics(SM_CXVIRTUALSCREEN);
    unsigned int nScreenHeight = GetSystemMetrics(SM_CYVIRTUALSCREEN);
    * width = nScreenWidth;
    * height = nScreenHeight;

    HDC hCaptureDC = CreateCompatibleDC(desktopGuard.get());
    if (!hCaptureDC)
    {
        throw std::runtime_error("SpliceImages: CreateCompatibleDC failed");
    }
    captureGuard.reset(hCaptureDC);

    HBITMAP hCaptureBmp = CreateCompatibleBitmap
      (desktopGuard.get(), nScreenWidth, nScreenHeight);
    if(!hCaptureBmp)
    {
        throw std::runtime_error("SpliceImages: CreateCompatibleBitmap failed");
    }
    bmpGuard.reset(hCaptureBmp);

    originalBmp = SelectObject(hCaptureDC, hCaptureBmp);
    if (!originalBmp || (originalBmp == (HBITMAP)GDI_ERROR))
    {
        throw std::runtime_error("SpliceImages: SelectObject failed");
    }

    // Calculating coordinate shift if any monitor has negative coordinates
    long shiftLeft = 0;
    long shiftTop = 0;
    for(ScreenShooter::HDCPoolType::iterator it =
      pHdcPool->begin(); it != pHdcPool->end(); ++it)
    {
        if( it->second.left < shiftLeft)
            shiftLeft = it->second.left;
        if(it->second.top < shiftTop)
            shiftTop = it->second.top;
    }

    for(ScreenShooter::HDCPoolType::iterator it =
      pHdcPool->begin(); it != pHdcPool->end(); ++it)
    {
        if (!BitBlt(hCaptureDC, it->second.left - shiftLeft,
    it->second.top - shiftTop, it->second.right - it->second.left,
    it->second.bottom - it->second.top, it->first, 0, 0, SRCCOPY))
        {
            throw std::runtime_error("SpliceImages: BitBlt failed");
        }
    }
}
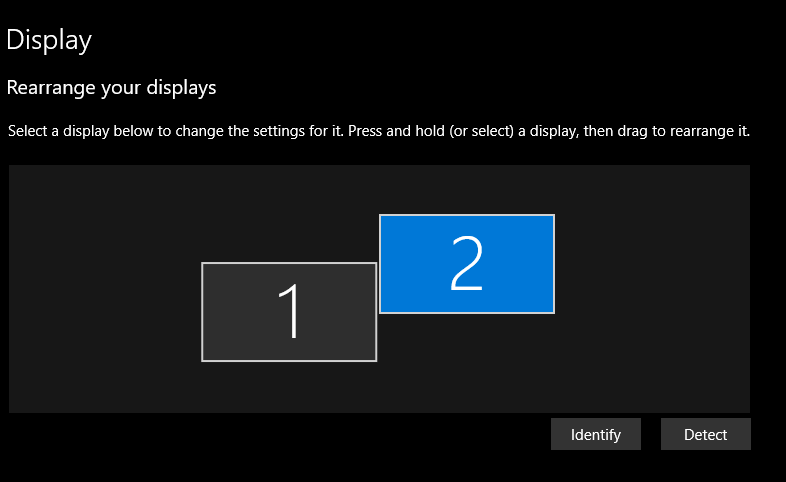
An example arrangement of monitors on a virtual screen is presented below. Monitor 2 has a negative top coordinate value. By calculating the y coordinate shift, we can locate the captures of the monitors, keeping the locations of windows and desktops on the bitmap.
Possible arrangement of displays:

Figure 2. The physical arrangement of two monitors
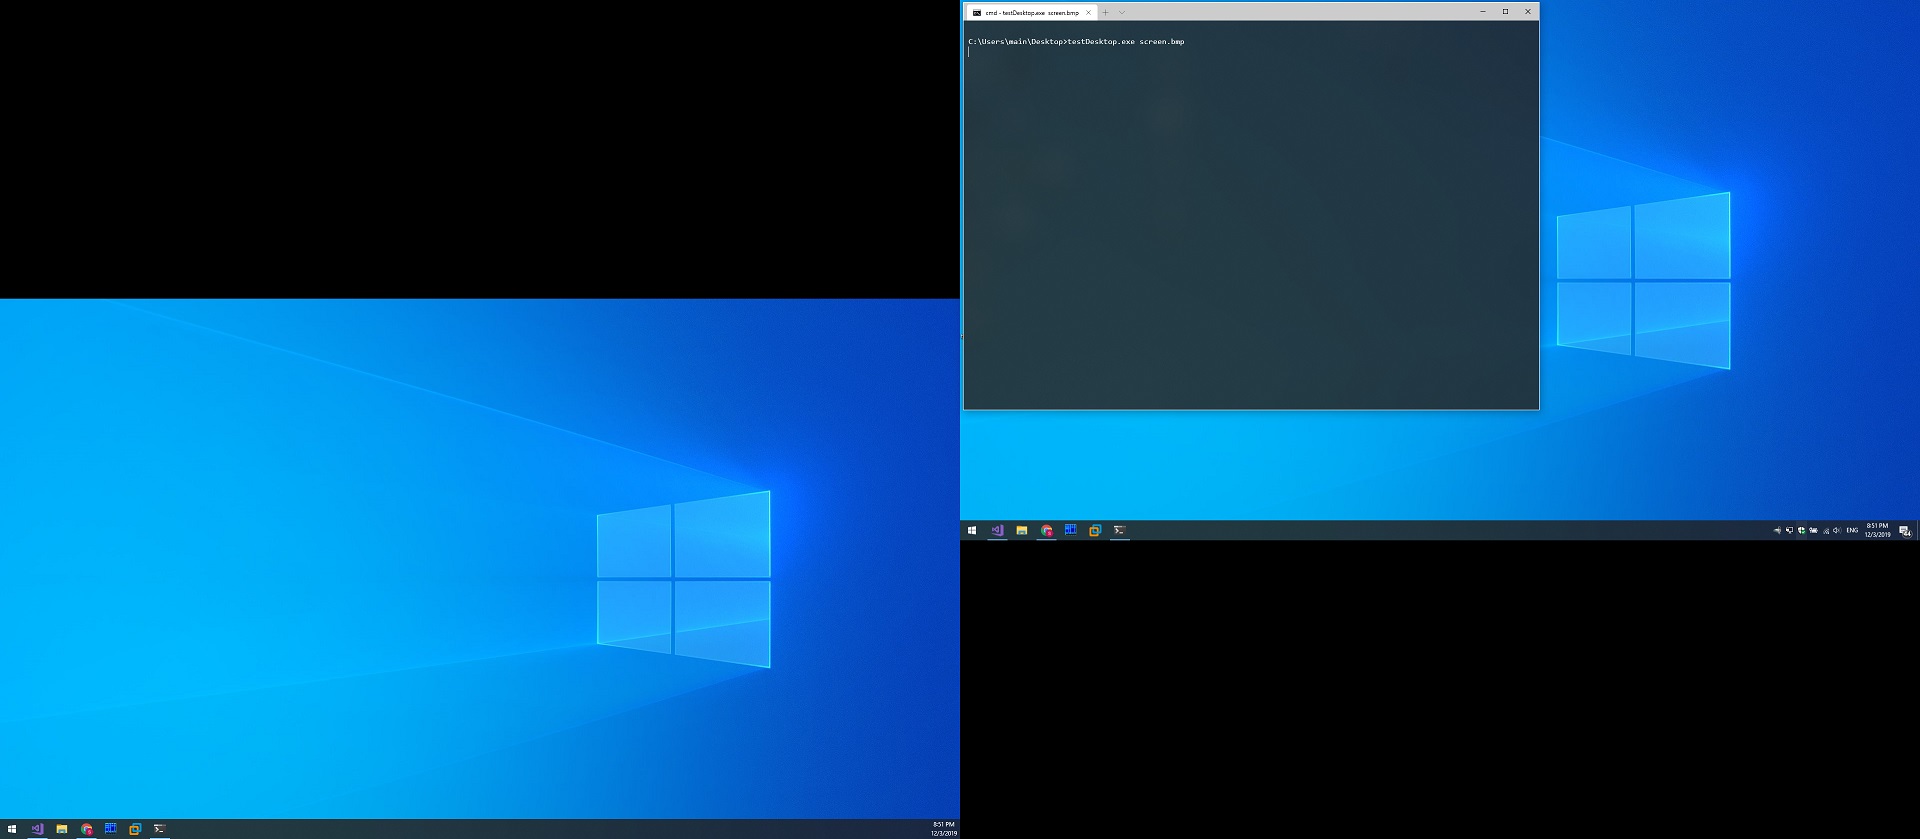
As a result, we get the following screenshot:

Figure 3. WinAPI takes a snapshot of a multi-monitor screen
Conclusion
In this article, we showed how to take multi-monitor screenshots with WinAPI GDI functions. We also provided a detailed template code here that you can use for taking multi-monitor screenshots in your own solution.
At Apriorit, we have experienced teams of software developers that are ready to help you build a product in C, C++, and other programming languages.
Leverage our experience for your next project!
By partnering with Apriorit, get a reliable partner for secure, productive, and efficient C++ development.


