At Apriorit, we developed several custom Windows and Linux virtual file system implementations, and so we decided to share our knowledge on the topic in this series of articles. This article will be useful for any developers who wish to create Windows virtual file system that can process file operations in its own fashion.
File system virtualization is a great technique for protecting users from the complexities of storage management, especially when files are stored in various points across networks. Each virtual file system implementation allows presenting the data storage to the user in a way you want it, using computing to completely separate representation from the way files are actually stored. However, implementing virtual file system can be fairly complex, and requires knowledgeable and experienced development team.
The solution that virtualizes file system, described in this article, has become popular due to the rapid development of services such as Dropbox and Google Drive for accessing files remotely. All the popular cloud storage providers offer file APIs to work with files in the cloud from your applications. Using such an API, a developer can implement a logical drive that works directly with files in cloud storage.
Here’s the basic structure of such a solution:
- Kernel mode driver
- User mode service
- Mounting utility (can be a simple console app)
The kernel mode driver redirects file operation requests to the user mode service, which provides the interface for processing these file operations in user mode. This approach allows a developer to abstract kernel mode development and file entities and work only with file operations.
Let’s consider each part of this virtualization file system solution in detail.
Driver
The driver implements the file system. It includes the logic for redirecting file operations and managing disks.
For our purposes, during installation this driver will create a few devices.
Control device
The first device the driver will create is a control device that’s used for disk management. It provides a developer with capabilities to mount and unmount drives.
    // create control device
    RtlInitUnicodeString(&deviceName, FS_CONTROL_DEVICE_NAME);
    status = IoCreateDevice(
        pDriverObject,
        sizeof(FS_CONTROL_DEVICE_EXTENSION),
        &deviceName,
        FILE_DEVICE_UNKNOWN,
        0,
        FALSE,
        &pControlDevice
        );
...
Communication device
The second device that will be created is a communication device. It implements synchronization between the driver and the user mode service. This service sends certain codes to the device to indicate its state: whether it’s going to start or stop or is ready to receive requests.
    // create communication device
    RtlInitUnicodeString(&deviceName, FS_COMMUNICATION_DEVICE_NAME);
    status = IoCreateDevice(
        pDriverObject,
        sizeof(FS_COMMUNICATION_DEVICE_EXTENSION),
        &deviceName,
        FILE_DEVICE_UNKNOWN,
        0,
        TRUE,
        &pCommDeviceObject
        );
...
Redirector device
The last device that will be created is a redirector device. It catches file operation requests sent to the mounted drive and redirects them to the user mode service that must implement handlers for these operations.
   // create redirector device
    RtlInitUnicodeString(&deviceName, FS_REDIRECTOR_DEVICE_NAME);
    status = IoCreateDevice(
        pDriverObject,
        sizeof(FS_REDIR_DEVICE_EXTENSION),
        &deviceName,
        FILE_DEVICE_NETWORK_FILE_SYSTEM,
        FILE_REMOTE_DEVICE,
        FALSE,
        &pRedirDevice
        );
...Kernel request handling
When these three devices are created, the driver is configured with a handler function for request processing. For that purpose, a single function is used: FSDispatchRequest. This is the most crucial part of the driver and should be implemented carefully.
// Dispatch IRP context
NTSTATUS FSDispatchRequest(
    IN PFS_IRP_CONTEXT  pIrpContext
    )
{
...
    switch (pIrpContext->MajorFunction)
    {
    case IRP_MJ_CREATE:...
    case IRP_MJ_CLEANUP:...
    case IRP_MJ_CLOSE:...
    case IRP_MJ_QUERY_INFORMATION:...
    case IRP_MJ_DIRECTORY_CONTROL:...
    case IRP_MJ_QUERY_VOLUME_INFORMATION:...
    case IRP_MJ_READ:...
    case IRP_MJ_WRITE:...
    case IRP_MJ_SET_INFORMATION:...
    case IRP_MJ_FLUSH_BUFFERS:...
    case IRP_MJ_LOCK_CONTROL:...
    case IRP_MJ_DEVICE_CONTROL:
        return FSDeviceControl(pIrpContext);
    case IRP_MJ_SET_VOLUME_INFORMATION:...
    case IRP_MJ_FILE_SYSTEM_CONTROL:...
    case IRP_MJ_QUERY_SECURITY:...
    case IRP_MJ_SET_SECURITY:...
    default:...
    }
...
}
Since the driver is a file system and is not a file system filter, it must handle every file operation code itself – codes cannot be forwarded to other file systems, but can be forwarded only to the driver for the disk storage that is formatted for this file system.
Once the virtual disk driver is fully initialized, Windows I/O Manager can ask it to recognize a new volume. If the volume is not recognized by any file system, the RAW file system will be assigned and the user will be asked to format the disk when he or she accesses that drive for the first time. However, this does not happen for our virtual disk! When the disk mounting request arrives, our file system is assigned to the new volume and, from this moment on, the I/O manager starts sending file operation requests for the mounted disk to our driver.
When these file operation requests arrive, they’re all sent to the service for processing in user mode.
        // send request to the service
        status = FSSendRequestToService(
            pIrpContext,
            FS_REQUEST_CREATE,
            pCreateFileRequest,
            sizeof(FS_CREATE_REQUEST) + fileName.Length,
            NULL,
            0,
            TRUE,
            pIrpContext->IsSynchronous ? &event : NULL
            );
...
All control codes (except IRP_MJ_DEVICE_CONTROL) correspond to Win32 file operations. The IRP_MJ_DEVICE_CONTROL code is designed to solve tasks that are not directly related to file operations. In the solution described in this article, this code is used by all devices for disk management, service synchronization, and handling of file system control codes. In order to detect for which device a request has been sent, its header is checked.
Requests that are sent to the communication device perform service synchronization tasks. The service sends these requests to indicate its readiness to recover file operations for further processing (IOCTL_FS_SEND_REQUEST) and to send responses regarding certain file operations (IOCTL_FS_RECEIVE_RESPONSE). It also sends signals when it is going to start (IOCTL_FS_START) or stop (IOCTL_FS_STOP and IOCTL_FS_FILE_CACHE_CONTROL).
if (pHeader->NodeTypeCode == FS_MDE_TYPE_CODE)
    {
        // the request has been sent to communication device
      ...
        // test the value of the control code
        switch (controlCode)
        {
        case IOCTL_FS_SEND_REQUEST:...
        case IOCTL_FS_RECEIVE_RESPONSE:...
        case IOCTL_FS_START:...
        case IOCTL_FS_STOP:...
        case IOCTL_FS_FILE_CACHE_CONTROL:...
        }
        return status;
    }
If the request is not for the communication device, it’s checked whether it’s for the control device. The control device can process disk management requests such as to mount a disk (IOCTL_FS_ADD_DISK), unmount a disk (IOCTL_FS_DELETE_DISK) or get a list of existing drives (IOCTL_FS_GET_DISKS).
else if (pHeader->NodeTypeCode == FS_CDE_TYPE_CODE)
    {
        // the request has been sent to control device
...
        // test the value of the control code
        switch (controlCode)
        {
        case IOCTL_FS_ADD_DISK: ...
        case IOCTL_FS_DELETE_DISK: ...
        case IOCTL_FS_GET_DISKS: ...
        default:
            ...
}
Finally, if the request is sent neither for the communication device nor for the control device, it’s forwarded to the redirector device that implements handling of requests for removable storage, such as refreshing directories, querying volume names, and so on.
// Standard requests for removable storage
case IOCTL_DISK_MEDIA_REMOVAL:...
case IOCTL_STORAGE_MEDIA_REMOVAL:...
case IOCTL_DISK_EJECT_MEDIA:...
case IOCTL_STORAGE_EJECT_MEDIA:...
case IOCTL_DISK_CHECK_VERIFY:...
case IOCTL_STORAGE_CHECK_VERIFY:...
case IOCTL_MOUNTDEV_QUERY_DEVICE_NAME:...
case IOCTL_MOUNTDEV_QUERY_UNIQUE_ID:...
case IOCTL_DISK_IS_WRITABLE:...
case IOCTL_MF_GET_BASE_DEVICE_REF:...
case IOCTL_FILE_DIR_CHANGE_NOTIFY:...
default:...Mounting tool
The mounting tool is an application that works with a control device and allows a user to mount or unmount a drive.
Mounting implementation example
The implementation of the simplest mounting tool looks like this:
int _tmain(int argc, _TCHAR* argv[])
{
    DWORD error = NO_ERROR;
    try
    {
        DiskInfo controlInfo;
        error = ParseArguments(argc, argv, controlInfo);
...
        if (controlInfo.cmd == mapCommand)
        {
            error = ExecuteMapCommand(controlInfo);
        }
        else if (controlInfo.cmd == unmapCommand)
        {
            error = ExecuteUnmapCommand(controlInfo);
        }
        else
        {
            std::wcerr << L"Invalid command: " << controlInfo.cmd;
            return ERROR_INVALID_PARAMETER;
        }
    }
    catch (const std::exception& ex)
    {
...
    }
    return error;
}
DiskInfo is a simple structure with parameters for mounting or unmounting a drive.
struct DiskInfo
{
    DiskInfo()
        : disk('\0')
        , cachePath(L"C:\\cache")
    {
    }
    std::wstring cmd;
    wchar_t disk;
    std::wstring cachePath;
    std::wstring diskLabel;
};
In the simplest case, it’s enough to specify a command (map or unmap) and a disk letter. Optionally, a disk label or different cache path (other than C:cache) can be specified. If a disk label is not specified, one will be generated by the driver. The ParseArguments function parses arguments from CLI and fills in the DiskInfo structure. Then the ExecuteMapCommand/ExecuteUnmapCommand function sends the corresponding control code to the control device.
if (deviceControl.Control(IOCTL_FS_ADD_DISK, &addDiskStruct, sizeof(addDiskStruct)) == FALSE)
{
    throw cmn::WinException("ControlDevice failed");
}How disk mounting works
If the driver receives an IOCTL_FS_ADD_DISK request, the FSAddDisk function is called by the driver.
        case IOCTL_FS_ADD_DISK:
            // Add new disk
...
            status = FSAddDisk(pIrpContext);
            break;
This function checks if a driver with the mentioned letter already exists.
pExistingVolume = FSFindDiskInList(driveLetter, &sessionId);It also generates a name for the volume if one is not provided by the mounting tool.
status = FSGenerateVolumeName(NULL, driveLetter, &volumeNameLength);This name is generated simply using a combination of ExUuidCreate and RtlStringFromGUID kernel mode functions.
When a disk letter is checked and the volume name is prepared, a volume device and a disk device are created.
            // create volume device
            status = IoCreateDevice(
                pIrpContext->pDeviceObject->DriverObject,
                nVcbLen,
                NULL,
                FILE_DEVICE_DISK_FILE_SYSTEM,
                0,
                FALSE,
                &pVolumeDeviceObject
                );
...
            // create disk device
            status = IoCreateDevice(
                pIrpContext->pDeviceObject->DriverObject,
                sizeof(FS_DISK_DEVICE_EXTENSION),
                &volumeName,
                FILE_DEVICE_DISK,
                0,
                FALSE,
                &pDiskDeviceObject
                );
...
Now the disk and volume devices have been created, and the request is sent to the user mode service. The virtual disk is ready for use.
Service
The service implements the logic for handling disk requests in user mode. It starts the DeviceRequestThreadProc thread for request processing using the QueueUserWorkItem Win32 function.
...
        // initialize request manager
        THROW_LAST_ERROR_IF(!m_RequestManager.OpenDevice());
        // start thread for processing requests from disk device
        THROW_LAST_ERROR_IF(!::QueueUserWorkItem(
            &CRequestManager::DeviceRequestThreadProc,
            NULL,
            WT_EXECUTEINPERSISTENTTHREAD));
...
In this DeviceRequestThreadProc thread, the service indicates that it’s ready to receive a request.
if (!m_Communication.ControlOverlapped(IOCTL_FS_SEND_REQUEST,
        &m_RequestOverlapped,
        NULL,
        0,
        lpBuffer,
        dwBufferLength,
        pdwBytesReceived))
{
    return ::GetLastError();
}
Once a request has been received from the driver, it’s processed in a separate thread depending on the type of operation.
            // process request depending on its code
            try
            {
                switch (requestHeader.RequestCode)
                {
                    DISPATCH_REQUEST(
                        FS_REQUEST_CREATE,
                        FS_CREATE_REQUEST,
                        pThis,
                        requestHeader,
                        pRequestBody,
                        requestHeader.StructSize,
                        &CRequestManager::CreateResponse);
...
In order to process file system requests, the service provides an interface for custom implementation of all file operations. (Note that in the example below, most parameters are replaced with “…” for the sake of simplicity.)
// IProtocolManager
class IProtocolManager
{
public:
    virtual DWORD FSConnect(
        IN PVOID                            pvConnectInfo,
        IN PBOOL                            pfReadOnly
        ) = 0;

    virtual DWORD FSDisconnect() = 0;

    virtual DWORD FSCreateFile(
        IN LPCWSTR         pcwstrFileName,
        IN BOOL            fDirectory,
        IN BOOL            fExists,
        IN DWORD           dwFileAttributes,
        IN DWORD           dwCreateDisposition,
        IN ACCESS_MASK     DesiredAccess,
        IN WORD            wShareAccess,
        IN BOOL            firstCreate,
        OUT PFS_FILE_HANDLE phFileHandle,
        OUT PDWORD          pdwCreateInfo,
        OUT PFS_FILE_INFO   pFileInfo,
        OUT PBOOL           pfAllowCache,
        OUT PBOOL           pfPurgeCache,
        OUT PFS_PROCESS_INFO pProcessInfo
        ) = 0;
    virtual DWORD FSCloseFile(
        IN FS_FILE_HANDLE  hFileHandle,
        IN BOOL            fDelete,
        IN PFS_PROCESS_INFO pProcessInfo
        ) = 0;
    virtual DWORD FSReleaseFile(...) = 0;
    virtual DWORD FSQueryFileInfo(...) = 0;
    virtual DWORD FSSetFileSize(...) = 0;
    virtual DWORD FSSetFileBasicInfo(...) = 0;
    virtual DWORD FSDeleteFile(...) = 0;
    virtual DWORD FSRenameFile(...) = 0;
    virtual DWORD FSQueryDirContents(...) = 0;
    virtual DWORD FSReadFile(...) = 0;
    virtual DWORD FSWriteFile(...) = 0;
    virtual DWORD FSQueryVolumeInfo(...) = 0;
    virtual DWORD FSSetVolumeInfo(...) = 0;
    virtual DWORD FSLockFile(...) = 0;
    virtual void FSReleaseManager() = 0;
};
When this interface is implemented, users are able to create a drive to work with files as desired.
Read also:
File System Virtualization – Part 2
Example use
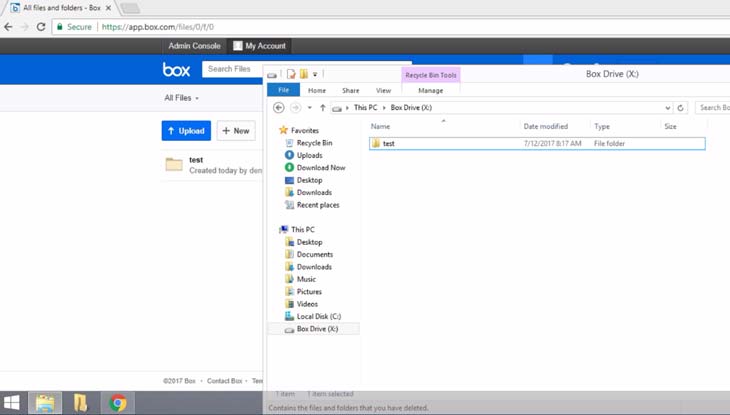
Using the interface mentioned above, a full-featured user mode file system can be implemented. Here’s an example of a solution that works with files in box.com cloud storage using box files API.
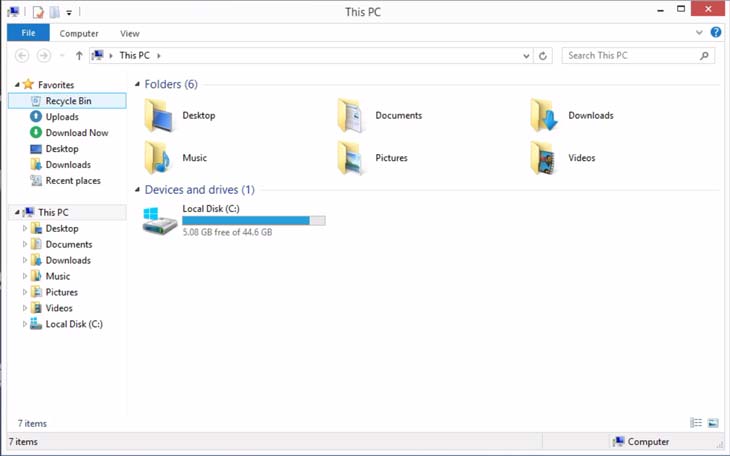
Let’s consider the following system with only one drive.

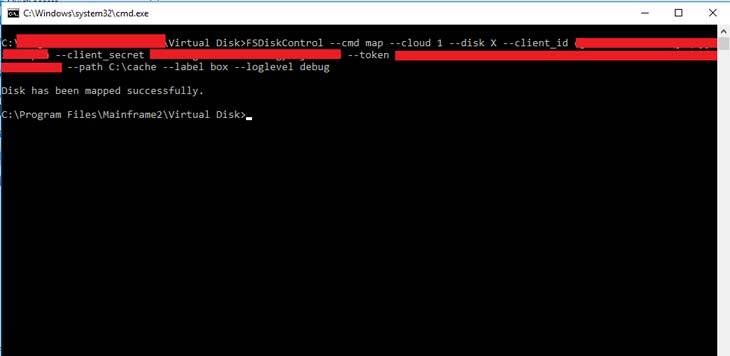
The mounting tool in this example is adjusted with additional parameters that are required for working with the box files API.

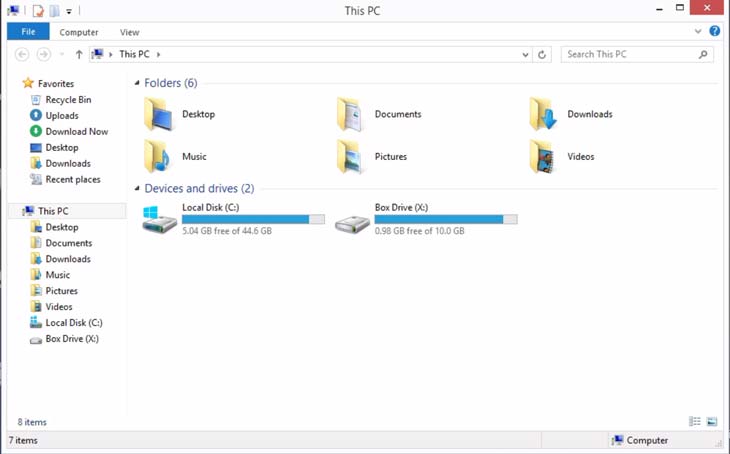
The result of running the FSDiskControl mounting tool is a new drive that works with files in your box.com file storage:


Conclusion
In this article, we’ve described a solution that allows users to implement virtual file system in operating system for the price of implementing a single interface. Furthermore, no kernel mode implementation or advanced file system knowledge is required, and users can rely on any high-level libraries and solutions they like.
In the second part of this article, we’ll provide an example of a cloud service plugin (like that shown in the example in this article) and describe its implementation.


