Did you know that a set of computer algorithms can process a video stream in a way that allows them to detect criminal activity, control traffic jams, and even automatically detect events in sports broadcasts? Thanks to the application of machine learning (ML), the idea of acquiring so much data from a simple video doesn’t seem that unrealistic. In this article, we want to share our experience applying the pre-built logic of a machine learning algorithm for object detection and segmentation to a video.
In particular, we talk about how to configure Google Colaboratory for solving video processing tasks with machine learning. You’ll learn how to use this Google service and the free NVIDIA Tesla K80 GPU that it provides for achieving your own goals in training neural networks. This article will be useful for people who are getting familiar with machine learning and considering working with image recognition and video processing.
Image processing with limited hardware resources
Apriorit was tasked with recognizing people in a video recording with the help of machine learning (ML) algorithms. We decided to begin with the basics. First, let’s consider what a video recording actually is.
From a technical point of view, any video recording consists of a series of still images in a particular format that are compressed with a video codec. Consequently, object recognition on a video stream comes down to splitting the stream into separate images, or frames, and applying a pre-trained ML image recognition algorithm to them.
To do this, we decided to use a neural network from the Mask_R-CNN repository for classifying single images. The repository contains an implementation of a convolutional neural network on Python 3, TensorFlow, and Keras. Let’s see what came out of this plan.
Plan a video processing feature?
Delegate your image and video processing challenges to Apriorit! Our AI and ML professionals have vast experience developing advanced software for such purposes.
Mask_RCNN sample
We developed and implemented a simple sample of Mask_RCNN that received a picture as the input and recognized objects in it. We created a sample on the basis of the demo.ipynb description taken from the Mask_R-CNN repository. Here’s the code of our sample:
import os, sys
import random
import math
import numpy as np
import skimage.io
import matplotlib
import matplotlib.pyplot as plt

os.chdir("/content/drive/My Drive/Colab Notebooks/MRCNN_pure")
sys.path.append("/content/drive/My Drive/Colab Notebooks/MRCNN_pure")

# Root directory of the project
ROOT_DIR = os.path.abspath(".")

# Import Mask RCNN
sys.path.append(ROOT_DIR)  # To find local version of the library
from mrcnn import utils
import mrcnn.model as modellib
from mrcnn import visualize
# Import COCO config
sys.path.append(os.path.join(ROOT_DIR, "samples/coco/"))  # To find local version
import coco

# Directory to save logs and trained model
MODEL_DIR = os.path.join(ROOT_DIR, "logs")

# Local path to trained weights file
COCO_MODEL_PATH = os.path.join(ROOT_DIR, "mask_rcnn_coco.h5")
# Download COCO trained weights from Releases if needed
if not os.path.exists(COCO_MODEL_PATH):
    utils.download_trained_weights(COCO_MODEL_PATH)

# Directory of images to run detection on
IMAGE_DIR = os.path.join(ROOT_DIR, "images")

class InferenceConfig(coco.CocoConfig):
    # Set batch size to 1 since we'll be running inference on
    # one image at a time. Batch size = GPU_COUNT * IMAGES_PER_GPU
    GPU_COUNT = 1
    IMAGES_PER_GPU = 1

config = InferenceConfig()
config.display()

# Create model object in inference mode.
model = modellib.MaskRCNN(mode="inference", model_dir=MODEL_DIR, config=config)

# Load weights trained on MS-COCO
model.load_weights(COCO_MODEL_PATH, by_name=True)

# COCO Class names
# Index of the class in the list is its ID. For example, to get ID of
# the teddy bear class, use: class_names.index('teddy bear')
class_names = ['BG', 'person', 'bicycle', 'car', 'motorcycle', 'airplane',
               'bus', 'train', 'truck', 'boat', 'traffic light',
               'fire hydrant', 'stop sign', 'parking meter', 'bench', 'bird',
               'cat', 'dog', 'horse', 'sheep', 'cow', 'elephant', 'bear',
               'zebra', 'giraffe', 'backpack', 'umbrella', 'handbag', 'tie',
               'suitcase', 'frisbee', 'skis', 'snowboard', 'sports ball',
               'kite', 'baseball bat', 'baseball glove', 'skateboard',
               'surfboard', 'tennis racket', 'bottle', 'wine glass', 'cup',
               'fork', 'knife', 'spoon', 'bowl', 'banana', 'apple',
               'sandwich', 'orange', 'broccoli', 'carrot', 'hot dog', 'pizza',
               'donut', 'cake', 'chair', 'couch', 'potted plant', 'bed',
               'dining table', 'toilet', 'tv', 'laptop', 'mouse', 'remote',
               'keyboard', 'cell phone', 'microwave', 'oven', 'toaster',
               'sink', 'refrigerator', 'book', 'clock', 'vase', 'scissors',
               'teddy bear', 'hair drier', 'toothbrush']

# Load a random image from the images folder
file_names = next(os.walk(IMAGE_DIR))[2]
image = skimage.io.imread(os.path.join(IMAGE_DIR, random.choice(file_names)))

# Run detection
results = model.detect([image], verbose=1)

# Visualize results
r = results[0]
visualize.display_instances(image, r['rois'], r['masks'], r['class_ids'],
                            class_names, r['scores'])
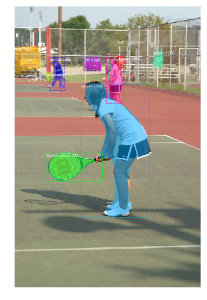
In this sample, /content/drive/My Drive/Colab Notebooks/MRCNN_pure is the path to our repository with Mask_R-CNN. As a result, we got the following:
This part of the demo code looks through the images folder, randomly selects an image, and loads it to our neural network model for classification:
# Load a random image from the images folder
file_names = next(os.walk(IMAGE_DIR))[2]
image = skimage.io.imread(os.path.join(IMAGE_DIR, random.choice(file_names)))

# Run detection
results = model.detect([image], verbose=1)
{/code}

Let’s modify the Mask_R-CNN sample to make it recognize all images in the images folder:

{code}# Load a random image from the images folder
file_names = next(os.walk(IMAGE_DIR))[2]

for file_name in file_names:
    image = skimage.io.imread(os.path.join(IMAGE_DIR, file_name))

    # Run detection
    results = model.detect([image], verbose=1)

    # Visualize results
    r = results[0]
    visualize.display_instances(image, r['rois'], r['masks'], r['class_ids'],
                        class_names, r['scores'])
Let’s modify the Mask_R-CNN sample to make it recognize all images in the images folder:
# Load a random image from the images folder
file_names = next(os.walk(IMAGE_DIR))[2]

for file_name in file_names:
    image = skimage.io.imread(os.path.join(IMAGE_DIR, file_name))

    # Run detection
    results = model.detect([image], verbose=1)

    # Visualize results
    r = results[0]
    visualize.display_instances(image, r['rois'], r['masks'], r['class_ids'],
                        class_names, r['scores'])
After running the demo code for five minutes, the console displayed the following output:
Processing 1 images
image shape: (415, 640, 3) min: 0.00000 max: 255.00000 uint8
molded_images shape: (1, 1024, 1024, 3) min: -123.70000 max: 151.10000 float64
image_metas shape: (1, 93) min: 0.00000 max: 1024.00000 float64
anchors shape: (1, 261888, 4) min: -0.35390 max: 1.29134 float32
Segmentation fault (core dumped)
Initially, we ran the demo code on a computer with an Intel Core i5 and 8GB of RAM without a discrete graphics card. The code crashed each time in different places, but most often it crashed in the TensorFlow framework during memory allocation. Moreover, any attempts to run any other software during the image recognition process slowed down the computer to the point of being useless.
Thus, we faced a serious problem: any experiments in getting familiar with ML required a powerful graphics card and more hardware resources. Without this, we couldn’t run any other tasks while recognizing a large number of images.
Read also
Artificial Intelligence for Image Processing: Methods, Techniques, and Tools
Explore ways to leverage AI-based digital image processing for your project. Apriorit experts share their insights along with AI image processing tools, techniques, and popular neural network models for working with images and videos.
Increasing our hardware resources with Google Colaboratory
We decided to expand our hardware resources by using the Colaboratory service by Google, which is also known as Colab. Google Colab is a free cloud service that provides use of a CPU and GPU as well as a preconfigured virtual machine instance. Specifically, Google offers the NVIDIA Tesla K80 GPU with 12GB of dedicated video memory, which makes Colab a perfect tool for experimenting with neural networks.
Before explaining how to work with this Google service, we’d like to underline other beneficial Colaboratory features.
By choosing Colab for your ML experiments, you’ll get:
- support for Python 2.7 and Python 3.6 so you can improve your coding skills;
- the ability to work with Jupyter notebook so you can create, edit, and share your .ipynb files;
- the ability to connect to a Jupyter runtime using your local machine;
- many pre-installed libraries including TensorFlow, Keras, and OpenCV, as well as the possibility to interact with your custom libraries in Google Colaboratory;
- upload functionality so you can add your trained model;
- integration with GitHub so you can load public GitHub notebooks or save a copy of your Colab file to GitHub;
- simple visualization with such popular libraries as matplotlib;
- forms that can be used to parameterize code;
- the ability to store Google Colab notebooks in your Google Drive.
In order to start using the Google Colab GPU, you just need to provide access to your .ipynb script that’s implemented in a Docker container. The Docker container is assigned to you only for 12 hours. All scripts created by you are stored by default in your Google Drive in the Colab Notebooks section, which is automatically created as you connect to Colaboratory. After the expiry of 12 hours, all of your data in the container will be deleted. You can avoid this by mounting your Google Drive in your container and working with it. Otherwise, the file system of the Docker image will be available only for a limited period of time.
Related project
Building an AI-based Healthcare Solution
Discover the details of developing an efficient AI-based healthcare system that processes ultrasound videos. Find out how Apriorit helped our client achieve impressive results — 90% precision and a 97% recall rate, allowing their doctors to optimize their work and improve the patient experience.
Configuring Google Colab
Let’s first explain how you can create your .ipynb notebook. Open Google Colaboratory here, select the Google Drive section, and click NEW PYTHON 3 NOTEBOOK:
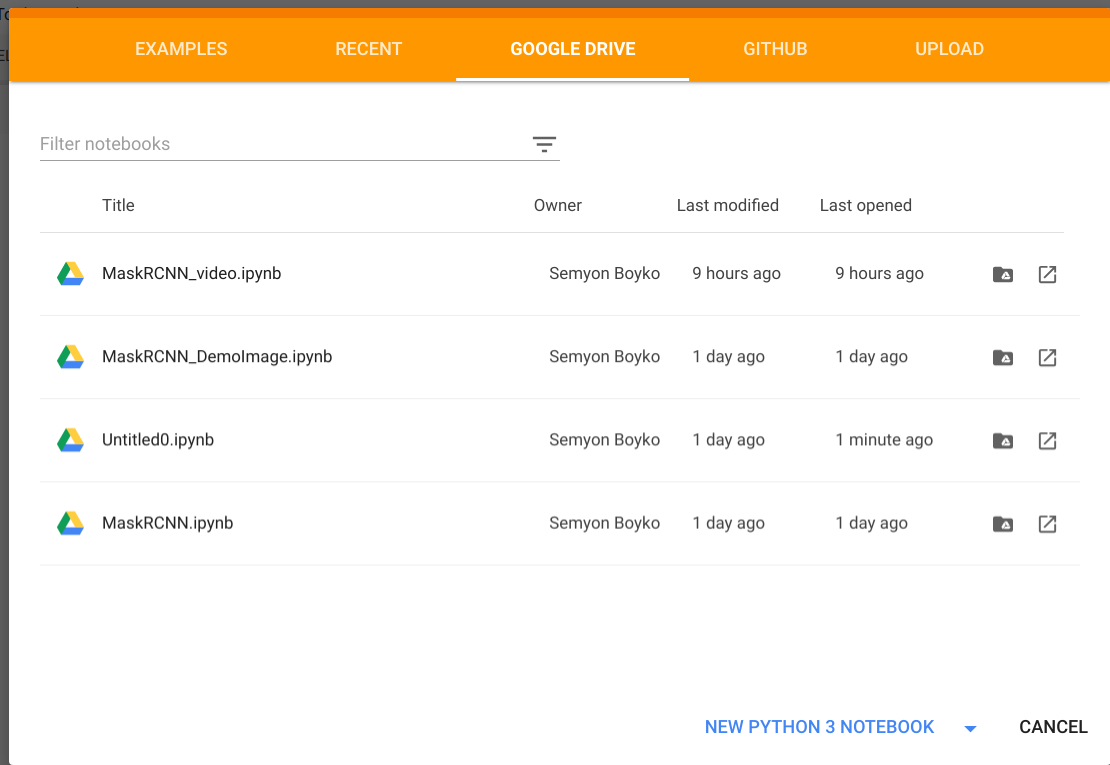
Rename your notebook whatever you want by clicking on the file name. Now you need to choose your hardware. To do this, just go to the Edit section, find Notebook Settings, select GPU as the Hardware accelerator, and save changes by clicking SAVE.
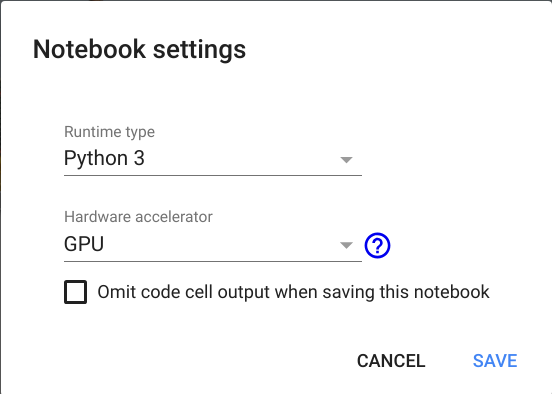
After the new settings are saved, a Docker container with a discrete graphics card will become available to you. You’ll be notified about this with a “Connected” message in the upper right of the page:

If you don’t see this message, select Connect to hosted runtime.
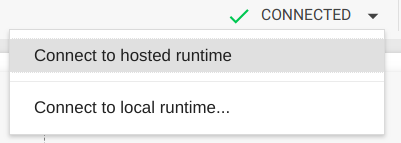
Now you can mount your Google Drive to this container in order to relocate the source code and save the results of your work in the container. To do this, just copy the code below in the first table cell and press the Play button (or Shift + Enter).
Mount Google Drive by running this code:
from google.colab import drive
drive.mount('/content/drive')
You’ll get a request for authorization. Click the link, authorize, copy the verification code, paste it in the text box in your .ipynb script, and press Enter. If authorization is successful, your Google Drive will be mounted under the path /content/drive/My Drive. To follow the file tree, select Files in the left-hand menu.
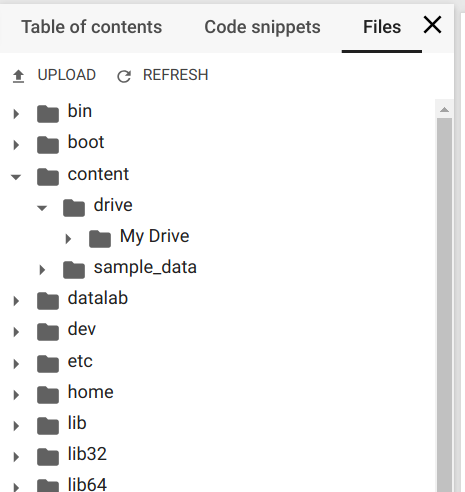
Now you have a Docker container with the Tesla K80 GPU, your Google Drive as file storage, and the .ipynb notebook for script execution.
Read also
How to Fix Image Distortions Using the OpenCV Library
Make sure your AI software can handle as much data as possible. Unveil the secrets of fixing image distortions using OpenCV from Apriorit experts.
Using Google Colab for object recognition
Now we’ll describe how to run our Mask_R-CNN sample for object recognition in Google Colab. We upload the Mask_RCNN repository to our Google Drive following the /content/drive/My Drive/Colab Notebooks/ path.
Then we add our sample code to the .ipynb script. When you do this, don’t forget to change your path to the Mask_RCNN folder like this:
os.chdir("/content/drive/My Drive/Colab Notebooks/MRCNN_pure")
sys.path.append("/content/drive/My Drive/Colab Notebooks/MRCNN_pure")
If you do everything right, the results of code execution will provide you with an image where all objects are detected and recognized.
You can also modify the sample code to make it process all of the test images:
import os, sys
import random
import math
import numpy as np
import skimage.io
import matplotlib
import matplotlib.pyplot as plt

os.chdir("/content/drive/My Drive/Colab Notebooks/MRCNN_pure")
sys.path.append("/content/drive/My Drive/Colab Notebooks/MRCNN_pure")

# Root directory of the project
ROOT_DIR = os.path.abspath(".")

# Import Mask RCNN
sys.path.append(ROOT_DIR)  # To find local version of the library
from mrcnn import utils
import mrcnn.model as modellib
from mrcnn import visualize
# Import COCO config
sys.path.append(os.path.join(ROOT_DIR, "samples/coco/"))  # To find local version
import coco

# Directory to save logs and trained model
MODEL_DIR = os.path.join(ROOT_DIR, "logs")

# Local path to trained weights file
COCO_MODEL_PATH = os.path.join(ROOT_DIR, "mask_rcnn_coco.h5")
# Download COCO trained weights from Releases if needed
if not os.path.exists(COCO_MODEL_PATH):
    utils.download_trained_weights(COCO_MODEL_PATH)

# Directory of images to run detection on
IMAGE_DIR = os.path.join(ROOT_DIR, "images")

class InferenceConfig(coco.CocoConfig):
    # Set batch size to 1 since we'll be running inference on
    # one image at a time. Batch size = GPU_COUNT * IMAGES_PER_GPU
    GPU_COUNT = 1
    IMAGES_PER_GPU = 1

config = InferenceConfig()
config.display()

# Create model object in inference mode.
model = modellib.MaskRCNN(mode="inference", model_dir=MODEL_DIR, config=config)

# Load weights trained on MS-COCO
model.load_weights(COCO_MODEL_PATH, by_name=True)

# COCO Class names
# Index of the class in the list is its ID. For example, to get ID of
# the teddy bear class, use: class_names.index('teddy bear')
class_names = ['BG', 'person', 'bicycle', 'car', 'motorcycle', 'airplane',
               'bus', 'train', 'truck', 'boat', 'traffic light',
               'fire hydrant', 'stop sign', 'parking meter', 'bench', 'bird',
               'cat', 'dog', 'horse', 'sheep', 'cow', 'elephant', 'bear',
               'zebra', 'giraffe', 'backpack', 'umbrella', 'handbag', 'tie',
               'suitcase', 'frisbee', 'skis', 'snowboard', 'sports ball',
               'kite', 'baseball bat', 'baseball glove', 'skateboard',
               'surfboard', 'tennis racket', 'bottle', 'wine glass', 'cup',
               'fork', 'knife', 'spoon', 'bowl', 'banana', 'apple',
               'sandwich', 'orange', 'broccoli', 'carrot', 'hot dog', 'pizza',
               'donut', 'cake', 'chair', 'couch', 'potted plant', 'bed',
               'dining table', 'toilet', 'tv', 'laptop', 'mouse', 'remote',
               'keyboard', 'cell phone', 'microwave', 'oven', 'toaster',
               'sink', 'refrigerator', 'book', 'clock', 'vase', 'scissors',
               'teddy bear', 'hair drier', 'toothbrush']

# Load a random image from the images folder
file_names = next(os.walk(IMAGE_DIR))[2]

for file_name in file_names:
    image = skimage.io.imread(os.path.join(IMAGE_DIR, file_name))

    # Run detection
    results = model.detect([image], verbose=1)

    # Visualize results
    r = results[0]
    visualize.display_instances(image, r['rois'], r['masks'], r['class_ids'],
                        class_names, r['scores'])
Using object detection in Google Colab, we received the results with recognized objects quickly, while our computer continued to perform as usual even during the image recognition process.
Read also
Building AI Text Processing Modules for a Content Management Platform
Explore a success story of enhancing our client’s platform with AI-based text processing functionality for running various tasks upon a user’s request. See how Apriorit helped our client gain a competitive advantage in their niche and ensure a better user experience for their customers.

Using Google Colab for video processing
Let’s see how we applied this method for recognizing people in a video stream. We uploaded a test video file to our Google Drive. To train our script to work with a video stream, we used OpenCV, a popular open source computer vision library.
We don’t need the whole code that read and implemented the recognition model on one image. So instead of opening the video file, we run the video stream and move its pointer to the 1,000th frame as there are no objects to recognize in the intro of the recording.
import cv2
...
VIDEO_STREAM = "/content/drive/My Drive/Colab Notebooks/Millery.avi"
VIDEO_STREAM_OUT = "/content/drive/My Drive/Colab Notebooks/Result.avi"
...
# initialize the video stream and pointer to output video file
vs = cv2.VideoCapture(VIDEO_STREAM)
writer = None
vs.set(cv2.CAP_PROP_POS_FRAMES, 1000);
Then we process 20,000 frames with our neural network model. The OpenCV object allows us to get images by frame from the video file using the read() method. The received image is passed to the model.detect() method and the results are visualized with the visualize.display_instances() function.
However, we faced a problem: the display_instances() function from the Mask_RCNN repository reflects detected objects in the image, but the image doesn’t returned. We decided to simplify the display_instances() function and make it return the image with displayed objects:
def display_instances(image, boxes, masks, ids, names, scores):
    """
        take the image and results and apply the mask, box, and Label
    """
    n_instances = boxes.shape[0]
    colors = visualize.random_colors(n_instances)

    if not n_instances:
        print('NO INSTANCES TO DISPLAY')
    else:
        assert boxes.shape[0] == masks.shape[-1] == ids.shape[0]

    for i, color in enumerate(colors):
        if not np.any(boxes[i]):
            continue

        y1, x1, y2, x2 = boxes[i]
        label = names[ids[i]]
        score = scores[i] if scores is not None else None
        caption = '{} {:.2f}'.format(label, score) if score else label
        mask = masks[:, :, i]

        image = visualize.apply_mask(image, mask, color)
        image = cv2.rectangle(image, (x1, y1), (x2, y2), color, 2)
        image = cv2.putText(
            image, caption, (x1, y1), cv2.FONT_HERSHEY_COMPLEX, 0.7, color, 2
        )

    return image
After processing, the frames should be bound back together into a new video file. We can also do this with the OpenCV library. All we need to do is allocate the VideoWriter object from the OpenCV library:
fourcc = cv2.VideoWriter_fourcc(*"XVID")
writer = cv2.VideoWriter(VIDEO_STREAM_OUT, fourcc, 30, (masked_frame.shape[1], masked_frame.shape[0]), True)
using the type of video we provided for the input. We get the video file type with the help of the ffprobe command:
ffprobe Result.avi
...
 Duration: N/A, start: 0.000000, bitrate: N/A
    Stream #0:0: Video: mpeg4 (Simple Profile) (XVID / 0x44495658), yuv420p, 640x272 [SAR 1:1 DAR 40:17], 30 fps, 30 tbr, 30 tbn, 30 tbc
The received object can be used for per-frame recording: writer.write(masked_frame).
At the beginning of the script, we need to specify paths to the target video files for processing: VIDEO_STREAM and VIDEO_STREAM_OUT.
Here’s the full script that we developed for video recognition:
from google.colab import drive
drive.mount('/content/drive')

import os, sys
import random
import math
import numpy as np
import skimage.io
import matplotlib
import matplotlib.pyplot as plt
import cv2

from matplotlib.patches import Polygon

os.chdir("/content/drive/My Drive/Colab Notebooks/MRCNN_pure")
sys.path.append("/content/drive/My Drive/Colab Notebooks/MRCNN_pure")
VIDEO_STREAM = "/content/drive/My Drive/Colab Notebooks/Millery.avi"
VIDEO_STREAM_OUT = "/content/drive/My Drive/Colab Notebooks/Result.avi"

# Root directory of the project
ROOT_DIR = os.path.abspath(".")

# Import Mask RCNN
sys.path.append(ROOT_DIR)  # To find local version of the library
from mrcnn import utils
import mrcnn.model as modellib
from mrcnn import visualize
# Import COCO config
sys.path.append(os.path.join(ROOT_DIR, "samples/coco/"))  # To find local version
import coco

# Directory to save logs and trained model
MODEL_DIR = os.path.join(ROOT_DIR, "logs")

# Local path to trained weights file
COCO_MODEL_PATH = os.path.join(ROOT_DIR, "mask_rcnn_coco.h5")
# Download COCO trained weights from Releases if needed
if not os.path.exists(COCO_MODEL_PATH):
    utils.download_trained_weights(COCO_MODEL_PATH)

# Directory of images to run detection on
IMAGE_DIR = os.path.join(ROOT_DIR, "images")

class InferenceConfig(coco.CocoConfig):
    # Set batch size to 1 since we'll be running inference on
    # one image at a time. Batch size = GPU_COUNT * IMAGES_PER_GPU
    GPU_COUNT = 1
    IMAGES_PER_GPU = 1


def display_instances(image, boxes, masks, ids, names, scores):
    """
        take the image and results and apply the mask, box, and Label
    """
    n_instances = boxes.shape[0]
    colors = visualize.random_colors(n_instances)

    if not n_instances:
        print('NO INSTANCES TO DISPLAY')
    else:
        assert boxes.shape[0] == masks.shape[-1] == ids.shape[0]

    for i, color in enumerate(colors):
        if not np.any(boxes[i]):
            continue

        y1, x1, y2, x2 = boxes[i]
        label = names[ids[i]]
        score = scores[i] if scores is not None else None
        caption = '{} {:.2f}'.format(label, score) if score else label
        mask = masks[:, :, i]

        image = visualize.apply_mask(image, mask, color)
        image = cv2.rectangle(image, (x1, y1), (x2, y2), color, 2)
        image = cv2.putText(
            image, caption, (x1, y1), cv2.FONT_HERSHEY_COMPLEX, 0.7, color, 2
        )

    return image


config = InferenceConfig()
config.display()

# Create model object in inference mode.
model = modellib.MaskRCNN(mode="inference", model_dir=MODEL_DIR, config=config)

# Load weights trained on MS-COCO
model.load_weights(COCO_MODEL_PATH, by_name=True)

# COCO Class names
# Index of the class in the list is its ID. For example, to get ID of
# the teddy bear class, use: class_names.index('teddy bear')
class_names = ['BG', 'person', 'bicycle', 'car', 'motorcycle', 'airplane',
               'bus', 'train', 'truck', 'boat', 'traffic light',
               'fire hydrant', 'stop sign', 'parking meter', 'bench', 'bird',
               'cat', 'dog', 'horse', 'sheep', 'cow', 'elephant', 'bear',
               'zebra', 'giraffe', 'backpack', 'umbrella', 'handbag', 'tie',
               'suitcase', 'frisbee', 'skis', 'snowboard', 'sports ball',
               'kite', 'baseball bat', 'baseball glove', 'skateboard',
               'surfboard', 'tennis racket', 'bottle', 'wine glass', 'cup',
               'fork', 'knife', 'spoon', 'bowl', 'banana', 'apple',
               'sandwich', 'orange', 'broccoli', 'carrot', 'hot dog', 'pizza',
               'donut', 'cake', 'chair', 'couch', 'potted plant', 'bed',
               'dining table', 'toilet', 'tv', 'laptop', 'mouse', 'remote',
               'keyboard', 'cell phone', 'microwave', 'oven', 'toaster',
               'sink', 'refrigerator', 'book', 'clock', 'vase', 'scissors',
               'teddy bear', 'hair drier', 'toothbrush']

# Initialize the video stream and pointer to output video file
vs = cv2.VideoCapture(VIDEO_STREAM)
writer = None
vs.set(cv2.CAP_PROP_POS_FRAMES, 1000);

i = 0
while i < 20000:
  # read the next frame from the file
  (grabbed, frame) = vs.read()
  i += 1

  # If the frame was not grabbed, then we have reached the end
  # of the stream
  if not grabbed:
    print ("Not grabbed.")
    break;

  # Run detection
  results = model.detect([frame], verbose=1)

  # Visualize results
  r = results[0]
  masked_frame = display_instances(frame, r['rois'], r['masks'], r['class_ids'],
                            class_names, r['scores'])

  # Check if the video writer is None
  if writer is None:
    # Initialize our video writer
    fourcc = cv2.VideoWriter_fourcc(*"XVID")
    writer = cv2.VideoWriter(VIDEO_STREAM_OUT, fourcc, 30,
      (masked_frame.shape[1], masked_frame.shape[0]), True)

  # Write the output frame to disk
  writer.write(masked_frame)

# Release the file pointers
print("[INFO] cleaning up...")
writer.release()
After successful execution of the script, our video file with recognized images will be located in the path specified in VIDEO_STREAM_OUT. We run our system using a piece of a movie and receive a video file with recognized objects:
Conclusion
In this article, we’ve shown you how we took advantage of Google Colab and explained how you can do the following:
- Use a free Tesla K80 GPU provided by Google Colab
- Classify images with the Mask_RCNN neural network and Google Colab
- Classify objects in a video stream using Mask_RCNN, Google Colab, and the OpenCV library
At Apriorit, we have a team of dedicated professionals who can use machine learning technologies to your benefit. Image and video processing are among the key areas we’re investing our efforts in now.
Need help with AI & ML projects?
Leverage Apriorit’s expertise in modern technologies and receive a top-notch solution or improve existing software with video processing features!


