Skip to main content

REST APIs are crucial for any product that interacts with web services. A REST API acts as a bridge between web services, handling sensitive data and powering critical applications. Therefore, securing REST APIs against potential attacks by detecting and eliminating vulnerabilities must be a top priority for every organization.
A proven way to develop a secure REST API is using Node.js because of its real-time data processing capabilities and scalability. Node.js security libraries and features allow developers to effectively secure REST APIs and prevent data breaches, unauthorized access, and other cyber threats.
In this article, we explore best practices for creating a secure REST API in Node.js, focusing on protecting against common attack vectors. This guide will be particularly valuable for software project leaders seeking to understand risks and solutions associated with API security and for those considering Node.js for their web service projects.
Contents:
Why REST API security is critical
What is a REST API?
A REST API is a set of rules and conventions for creating and interacting with web services. It uses standard HTTP methods such as GET, POST, PUT, and DELETE to perform operations on resources identified by unique URLs.
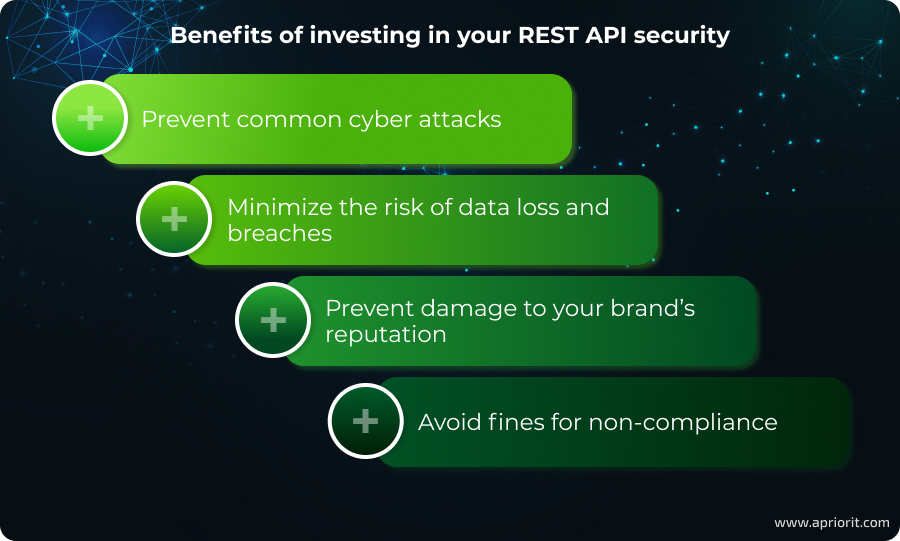
REST APIs often serve as the backbone for transmitting sensitive data between clients and servers. This makes REST APIs an attractive target for hackers, who use different tactics to break their security and get access to valuable data. By protecting them with proven security measures, you can:
To build a REST API with Node.js, secure it, and access these benefits, you need to know exactly what to protect against. The most frequent attacks on REST APIs include:
- SQL injections — Attackers inject malicious SQL queries to gain unauthorized access to databases.
- Cross-site scripting (XSS) — Malicious scripts are embedded in web pages, targeting other users’ browsers to steal data.
- DDoS attacks — Servers are overwhelmed with excessive requests, disrupting services for legitimate users.
- JSON web token exploits — Poorly secured or implemented tokens can be forged, granting unauthorized access.
- Unauthorized access — Exploits in authentication mechanisms allow attackers to access restricted resources.
So, how do you secure your REST APIs from these attacks and avoid costly data leaks and breaches? For this, you can use Node.js.
Looking for ways to secure your software?
Join forces with our cybersecurity experts and maintain your business reputation by delivering a safe and reliable product!
Node.js for securing REST APIs: benefits and use cases
At Apriorit, we frequently use Node.js to secure REST APIs. In our experience, it has proven to be a practical choice for many projects. Its event-driven architecture, broad library support, and ability to handle real-time data make it well-suited for building secure and scalable APIs. The key benefits of using Node.js for API security are:
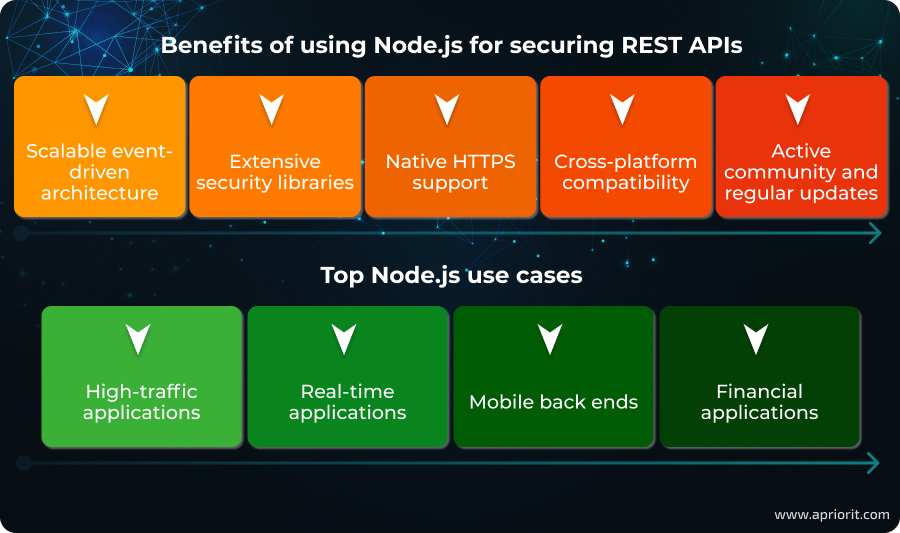
- Scalable event-driven architecture. Node.js-based software can handle multiple requests efficiently using a non-blocking I/O model, making it ideal for implementing real-time security features like rate limiting and threat monitoring.
- Extensive security libraries. The rich ecosystem includes tools like Helmet.js for securing HTTP headers, jsonwebtoken for authentication, and bcrypt.js for password hashing. These tools simplify the implementation of advanced security measures.
- Native HTTPS support. Node.js provides built-in support for HTTPS, enabling easy data encryption to protect data in transit against interception and man-in-the-middle attacks.
- Cross-platform compatibility. Because it can work seamlessly across platforms and devices, Node.js supports the creation of APIs that integrate securely with diverse client systems.
- Active community and regular updates. Frequent updates from the Node.js community ensure that vulnerabilities are patched quickly, helping developers maintain strong security standards.
Node.js is particularly effective for securing REST APIs in the following contexts:
- High-traffic applications like social media platforms, messaging apps, or any system that processes a large volume of concurrent requests, such as streaming services or online marketplaces.
- Real-time applications requiring real-time interactions, like live dashboards or multiplayer games, where a secure and instantaneous data flow is essential. You can also apply the real-time capabilities of Node.js for security monitoring.
- Mobile back ends, including APIs for mobile applications, where speed and secure communication between devices are priorities.
- Financial applications handling sensitive financial data or transactions, where robust encryption and authentication are critical for compliance and user trust.
By combining its lightweight architecture with robust security tools, Node.js provides a strong foundation for building secure REST APIs.
In the next section, we’ll explore how you can build secure Node.js REST APIs.
Securing REST APIs with Node.js
To demonstrate how to create secure REST APIs in Node.js, we’ll focus on operations like user authentication and registration, as they’re common for any software product and involve sensitive data. We’ll use Express.js as a foundation to implement robust authentication and authorization mechanisms.
Express.js is a popular and minimalist Node.js framework, designed specifically for building server-side applications. It offers a convenient set of tools for creating routes, handling requests, and integrating with various libraries.
When creating a secure REST API in Node.js, it’s essential to follow key security practices, including:
- Preventing XSS and CSRF attacks. Use measures such as input sanitization, content security policies, cross-site request forgery (CSRF) tokens, and rate limiting to safeguard your application from malicious scripts, unauthorized actions, and excessive or potentially harmful requests.
- Password hashing. This practice ensures that user credentials are securely stored and cannot be easily compromised.
- Authorization tokens. Implementing tokens (such as JSON Web Tokens) ensures secure and efficient access to protected resources.
- Access control. Enforcing role-based access or permission settings prevents unauthorized users from accessing restricted resources.
In the next sections, we’ll provide you with detailed instructions on how to implement these practices when developing REST APIs in Node.js.
Read also
The 6 Most Common Security Issues in API Development and How to Fix Them
Protect the sensitive data flowing through your APIs. Learn common API threats and discover how to make your APIs immune to hacker attacks in our expert guide.

Step 1. Install Express.js
To begin, we’ll install Express.js using Node Package Manager (npm) by running the following command:
npm install expressThis command will automatically create a project directory to organize the files. This structure should include separate folders for routes, controllers, and models to ensure clean and maintainable code. With this setup, the project will be easier to manage and scale as it grows.
Step 2. Set up the application
First, we need to create an app.js file. It will serve as the entry point for your application and is critical for configuring essential middleware that enhances your API’s security and reliability. By using tools like Helmet, CORS, and RateLimit, you can protect your application against threats like XSS, DDoS, and brute-force attacks.
To set it up, let’s first import all the necessary dependencies:
- Express.js: A framework that handles HTTP requests
- Helmet: Secures HTTP headers to mitigate XSS and other attacks
- CORS: Manages cross-origin requests to prevent unauthorized access
- RateLimit: Controls request frequency to prevent abuse of the API and ensures server availability
Next, we’ll use this code to configure the imported dependencies by setting them up and applying them to the Express application:
dotenv.config();


const app = express();


app.use(helmet());
app.use(express.json());
app.use(cors());
app.use(rateLimit({
  windowMs: 15 * 60 * 1000, // 15 minutes
  max: 100 // no more than 100 requests per 15 minutes
}));
Note that in some cases, you’ll need to further configure the middleware contained in dependencies like helmet and rateLimit to meet your specific application needs. Let’s look at how to do it.
Helmet comprises multiple middleware functions that set security-related HTTP headers. If you need to disable specific headers (such as Content-Security-Policy for an API), you can do it like this:
app.use(
  helmet({
	contentSecurityPolicy: false,
  })
);
RateLimit helps you create dynamic rate limits for public APIs — for example, higher limits for authenticated users and lower limits for unauthenticated users. You can implement this with a keyGenerator:
app.use(
  rateLimit({
	windowMs: 15 * 60 * 1000,
	max: (req) => (req.user ? 1000 : 100),
	keyGenerator: (req) => req.user?.id || req.ip,
  })
);
After configuring middleware, you can define routes and set up error handling to ensure smooth operation and debugging:
const authRoutes = require('./routes/authRoutes');
app.use('/auth', authRoutes);

app.use((err, req, res, next) => {
  console.error(err.stack);
  res.status(500).send('Something went wrong!');
});
Now, we can launch the server and make our application accessible:
const PORT = process.env.PORT || 3000;
app.listen(PORT, () => {
  console.log(`Server is running on port ${PORT}`);
});
With this setup, our app is now well-protected against common threats like XSS, DDoS, and brute-force attacks.
Step 3: Create routes
The next step is to define the routes in their own file. This will ensure a modular structure, making the codebase easier to manage, scale, and secure.
To do this, create a file named routes/authRoutes.js. This file will define routes for handling user-related operations such as registration, login, and token verification.
Add the following code to the file:
const express = require('express');
const router = express.Router();
const authController = require('../controllers/authController');

router.post('/login', authController.login);
router.post('/register', authController.register);

module.exports = router;
To avoid backward compatibility issues and allow for smooth API updates, add versioning to the routes:
app.use('/v1/auth', authRoutes);This approach enables the support of multiple API versions, making it easier to maintain and update endpoints without disrupting existing users.
Read also
How We Scaled API Performance in a High-Load System and Avoided CPU Overload
Keep your system running smoothly even during periods of high load. Learn how to scale your API performance so your system can handle increased load without shutting down.

Step 4. Implement controller logic
Now, let’s implement the authentication logic for the application, including user login and registration. To ensure secure authentication, we’ll apply the following practices:
- Password hashing with bcryptjs protects against data breaches and ensures sensitive information is never stored in plain text.
- Token generation with jsonwebtoken provides secure, stateless authentication, allowing users to safely access protected resources.
First, we’ll create a controllers/authController.js file to handle authentication requests. In this file, we’ll implement the business logic for user authentication:
const bcrypt = require('bcryptjs');
const jwt = require('jsonwebtoken');
const HttpStatus = require('http-status-codes');
const userService = require('../services/userService');

exports.login = async (req, res, next) => {
  try {
	const { email, password } = req.body;
	const user = await userService.getUserByEmail(email);
	const isPasswordValid = await bcrypt.compare(password, user.password);
	if (!isPasswordValid) {
  	return res.status(HttpStatus.UNAUTHORIZED).json({ error: 'Invalid credentials' });
	}
	const token = jwt.sign({ userId: user.id }, process.env.JWT_SECRET, { expiresIn: '1h' });
	res.status(HttpStatus.OK).json({ token });
  } catch (err) {
	next(err);
  }
};

exports.register = async (req, res, next) => {
  try {
	const { email, password } = req.body;
	const hashedPassword = await bcrypt.hash(password, 12);
	await userService.createUser({ email, password: hashedPassword });
	res.status(HttpStatus.CREATED).json({ message: 'User created successfully' });
  } catch (err) {
	next(err);
  }
};
Now, the authentication process is protected with password hashing and tokens.
Step 5. Separate data from business logic
In this step, we’ll isolate the database logic from the controllers. This separation of concerns will help us maintain clean, scalable code and reduce the risk of exposing sensitive operations to unauthorized parts of the codebase.
First, we need to create a services/userService.js file. In this file, we’ll interact with the user model, which defines the structure and methods for interacting with the user table in the database. The user model provides an abstraction layer for common database operations like querying and creating user records.
Next, we’ll add the following code to the file:
const User = require('../models/User');

exports.getUserByEmail = async (email) => {
  return await User.findOne({ where: { email } });
};

exports.createUser = async (userData) => {
  return await User.create(userData);
};
Here are some important things to consider:
- Transactions: If you are creating a user and adding records to other tables (profiles, settings, etc.), use transactions to ensure data integrity.
- Caching: To optimize queries for frequently accessed data, consider using Redis or similar tools.
At this point, we have an interface for interacting with the database separately from our app’s business logic. This prevents direct access to the database from other parts of the application, such as the controllers.
Step 6. Create a user model
Create the file models/User.js. The user model describes the structure of the database table. It not only stores user data but also simplifies database interaction through an ORM (Object-Relational Mapping) library such as Sequelize.
Sequelize simplifies database interaction by allowing you to work with JavaScript models instead of raw SQL queries. It helps ensure security by preventing SQL injection attacks by automatically escaping query values. Additionally, it supports features like automatic migrations, cross-database compatibility, and transaction handling, which improve both the development process and data integrity.
Let’s set up Sequelize by adding the following code:
const { Sequelize, DataTypes } = require('sequelize');
const sequelize = new Sequelize(process.env.DB_NAME, process.env.DB_USER, process.env.DB_PASSWORD, {
  dialect: 'mysql'
});

const User = sequelize.define('User', {
  email: {
	type: DataTypes.STRING,
	allowNull: false,
	unique: true
  },
  password: {
	type: DataTypes.STRING,
	allowNull: false
  }
});

module.exports = User;
There are some important things you have to consider when working with user models:
- Indexes: Add indexes for frequently queried fields, such as those used in filtering (WHERE), sorting (ORDER BY), grouping (GROUP BY), or table joins (JOIN). However, be mindful that indexes take up additional memory and can slow down operations like inserting, updating, and deleting data, as each index needs to be updated.
- Field validation: Use Sequelize’s built-in validation methods to ensure that the email field contains valid email addresses and is not empty or duplicated. For example:
email: {
  type: DataTypes.STRING,
  allowNull: false,
  unique: true,
  validate: {
	isEmail: true,
  },
},
By creating the user model with Sequelize, we’ve established a way to interact with the user data in the database. This model simplifies database operations, improves security by preventing SQL injection, and ensures the integrity of our data through built-in validation and support for transactions.
In this example, we have protected our REST APIs from the most common threats like XSS, DDoS, and brute-force attacks. By integrating the necessary tools and libraries, we have protected our app’s authentication and registration, thus safeguarding the app from unauthorized access.
In addition, we have separated the authentication logic from the application, and the database logic from the controllers. This allows us to further protect our app from hackers and make it more scalable and maintainable.
Conclusion
As REST APIs handle sensitive data and are popular targets for cyber attacks, securing them is critical in every project. At Apriorit, we recommend using Node.js to ensure proper REST API protection.
The Node.js framework can help you implement the right security measures, such as password hashing, rate limiting, tokenization, and robust role-based access control. Building and securing APIs using Node.js is especially helpful for apps that handle sensitive data, deal with real-time operations, and process a high volume of transactions.
In this article, we’ve demonstrated the abilities of Node.js for securing the basic functionality that deals with user authentication and registration. However, in our real-life projects, we do much more.
Apriorit’s team of experts is ready to help you create a strong security foundation for your REST API, protecting your system from common threats. Our fluency in cybersecurity best practices will guarantee that your software is secure, resilient, and ready to handle any challenges.
Need a team of cybersecurity experts?
Contact us to leverage our 20+ years of experience in delivering bulletproof cybersecurity solutions!
Have a question?
Ask our expert!
R&D Delivery Manager