Skip to main content


Quantum computers will soon shake up the cybersecurity community. By 2029, Gartner expects them to make all modern cryptography unreliable, so software providers and cybersecurity experts need to start preparing their systems for this future.
In this article, we give you a detailed walkthrough of integrating the latest post-quantum algorithms into the architecture of encrypted network communications. You will learn how to use the crypto Golang package, Cloudflare, and Liboqs to secure HTTPS communications with post-quantum cryptography algorithms for key exchange and server certificate signature verification.
This article will be useful for technical leaders seeking examples of how to apply the latest NIST standards and other post-quantum algorithms within their systems.
Post-quantum cryptography as a response to quantum threats
Encryption is one of the most reliable methods to protect sensitive data. It secures information by transforming it into a format that is impossible to understand without the correct decryption key.
Traditional cryptographic algorithms are designed around complex mathematical problems that are too hard for classical computers to solve. However, the advent of quantum computing poses a significant threat, as these problems could become solvable.
For example, the quantum-powered Shor’s algorithm can efficiently break widely used encryption methods, including Rivest-Shamir-Adleman (RSA) and Elliptic Curve Cryptography (ECC). These methods are currently responsible for the security of data exchanges and digital signatures.
Vulnerabilities of modern cryptography in network security
Encryption is vital in many areas, such as securing stored data, protecting communications, and safeguarding financial transactions. In this article, we focus on network connection encryption, which is the backbone of modern digital communication and enables everything from web browsing to online banking.
TLS (Transport Layer Security) is the current industry standard for establishing secure network connections. It achieves this through key exchange protocols and digital signatures that rely on modern asymmetric cryptography algorithms. These algorithms are designed around complex mathematical problems that are too hard for classical computers to solve. However, the advent of quantum computing poses a significant threat, as these problems could become solvable with quantum algorithms like Shor’s.
Two critical mechanisms in TLS are particularly vulnerable to quantum attacks:
- Key establishment
Key exchange protocols, such as X25519, securely generate a shared session key between two parties without transmitting the key itself over the network. This session key is then used for encrypting and decrypting data during communication. Quantum computers could expose these shared keys, rendering this mechanism insecure.
- Digital signature verification
Digital signatures are vital in verifying a server’s authenticity and ensuring that communications are not intercepted or altered. They are used to sign certificates that prove a server’s identity and protect against man-in-the-middle (MITM) attacks. Current digital signature algorithms, such as RSA and ED25519, also depend on mathematical structures that could be compromised by quantum computing. If these signatures are broken, attackers could impersonate servers and intercept sensitive data.
To address these vulnerabilities — which are currently hypothetical but will soon become real — you need to adopt encryption algorithms that are resistant to powerful quantum computers. In this article, we focus on protecting key establishment mechanisms. While securing digital signatures is important, they pose less danger than insecure key establishment.
Need to protect your software against quantum threats?
Leverage our vast experience in cryptography to shield your data from current and future cyber attacks.
PQC as a solution
Post-quantum cryptography (PQC) refers to cryptographic algorithms designed to resist attacks from quantum computers. These algorithms are based on mathematical problems that even quantum computers cannot solve efficiently. Recent advancements in PQC include standards approved by the National Institute of Standards and Technology (NIST):
- FIPS 203 (ML-KEM): A lattice-based key encapsulation mechanism for secure key agreements.
- FIPS 204 (ML-DSA): A lattice-based digital signature standard derived from the CRYSTALS-Dilithium scheme for certificate authentication.
- FIPS 205 (SLH-DSA): A hash-based digital signature algorithm based on SPHINCS+, ideal for long-term security.
These algorithms ensure that cryptographic systems remain secure even as quantum computing becomes a reality.
Why invest in PQC now?
Although quantum computers can’t break modern cryptography just yet, it’s important to start implementing PQC as soon as possible for several reasons:
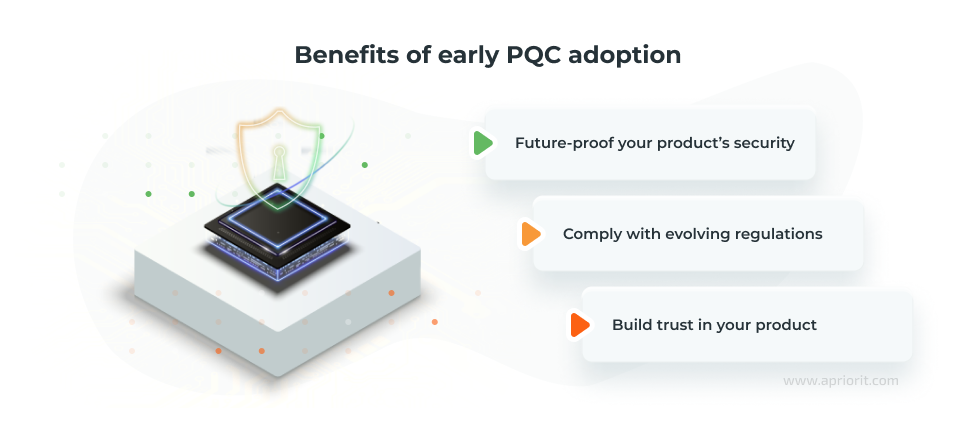
- Future-proof your product’s security. Early adoption of PQC will allow you to protect against emerging threats and avoid last-minute, high-cost migrations.
- Comply with evolving regulations. Regulatory organizations are already working on PQC standards that will soon be mandatory for industries handling sensitive data, such as finance, healthcare, and defense. By adopting post-quantum cryptographic solutions now, your organization can stay ahead of these regulations and ensure compliance without last-minute disruptions.
- Build trust in your product. Implementing advanced security measures will allow you to demonstrate a commitment to innovation and build trust with clients and stakeholders.
While offering significant benefits, adopting PQC this early poses certain challenges. Implementations of these algorithms have still not reached their maturity, so developers have a limited selection of libraries and out-of-the-box solutions for easy and intuitive implementation. However, the Golang programming language offers several implementation options that can be applied to real-world products right now.
Let’s take a close look at three ways to secure the key agreement process using PQC algorithms.
How to establish quantum-safe key agreement step by step
In this section, we explore the currently available ways to implement post-quantum encryption algorithms using the Golang programming language and available libraries. We overview how to do it using the Golang crypto package and also the Cloudflare and Liboqs Golang libraries. In each section, you’ll find detailed explanations on how to generate certificates, create PQC validation functions, set up your server and client, and more.
Using the Golang crypto package
To establish a quantum-safe key exchange between the server and the client, we’ll use the standard Golang crypto package. Although it has only begun adapting to post-quantum standards, the X25519Kyber768Draft00 hybrid post-quantum algorithm was added in version 1.23. In the following instructions, we demonstrate how to secure your key establishment procedure using this algorithm.
Note! Full support for this algorithm is planned for Golang 1.24.
Step 1. Generate certificates
Golang 1.23 doesn’t offer built-in generation of a certificate with quantum-proof digital signatures, so we use one of the non-post-quantum algorithms to allow a server to provide the certificate to a client.
Let’s implement the CreateKeyAndSelfSignedCertificate function, which will generate a certificate using the selected digital signature algorithm and save it to the filesystem.
The function allows us to choose among several of the most popular digital signature algorithms: RSA, ED25519, and P521.
import (
	"crypto/ecdsa"
	"crypto/ed25519"
	"crypto/elliptic"
	"crypto/rand"
	"crypto/rsa"
	"crypto/x509"
	"crypto/x509/pkix"
	"encoding/pem"
	"log"
	"math/big"
	"os"
	"time"
)
func CreateKeyAndSelfSignedCertificate(certFileName, keyFileName, algorithmName string) {
    var (
        publicKey, privKey any
        err                error
    )


    switch algorithmName {
    case "RSA":
        privKey, err = rsa.GenerateKey(rand.Reader, 248)
        publicKey = privKey.(rsa.PrivateKey).PublicKey
    case "ED25519":
        publicKey, privKey, err = ed25519.GenerateKey(rand.Reader)
    case "P521":
        privKey, err = ecdsa.GenerateKey(elliptic.P521(), rand.Reader)
        publicKey = privKey.(ecdsa.PrivateKey).PublicKey
    }


    if err != nil {
        log.Fatalf("Failed to generate a private key: %v", err)
    }


    //…
}
Now, we create the certificate and fill it with metadata, such as expiration time and organization name. In x509.CreateCertificate, we specify the private and public keys that will be used to generate a digital signature:
func CreateKeyAndSelfSignedCertificate(certFileName, keyFileName, algorithmName string) {
    //…
    serialNumberLimit := new(big.Int).Lsh(big.NewInt(1), 128)
    serialNumber, err := rand.Int(rand.Reader, serialNumberLimit)
    certTemplate := x509.Certificate{
        SerialNumber: serialNumber,
        Subject: pkix.Name{
            Organization: []string{"Organization name"},
        },
        NotBefore:             time.Now(),
        NotAfter:              time.Now().Add(365 * 24 * time.Hour),
        KeyUsage:              x509.KeyUsageDigitalSignature,
        ExtKeyUsage:           []x509.ExtKeyUsage{x509.ExtKeyUsageServerAuth},
        BasicConstraintsValid: true,
    }
    certDER, err := x509.CreateCertificate(rand.Reader, &certTemplate, &certTemplate, publicKey, privKey)
    if err != nil {
        log.Fatalf("Failed to create certificate: %v", err)
    }
    //…
}
Next, we save the generated certificate and key using this code:
func CreateKeyAndSelfSignedCertificate(certFileName, keyFileName, algorithmName string) {
    //…
    certFile, err := os.Create(certFileName)
    if err != nil {
        log.Fatalf("Failed to create file for writing the certificate: %v", err)
    }
    defer certFile.Close()


    if err := pem.Encode(certFile, &pem.Block{Type: "CERTIFICATE", Bytes: certDER}); err != nil {
        log.Fatalf("Failed to write data to cert.pem: %v", err)
    }


    privBytes, err := x509.MarshalPKCS8PrivateKey(privKey)
    if err != nil {
        log.Fatalf("Unable to marshal private key: %v", err)
    }


    keyFile, err := os.OpenFile(keyFileName, os.O_WRONLY|os.O_CREATE|os.O_TRUNC, 0600)
    if err != nil {
        log.Fatalf("Failed to open file for writing private key: %v", err)
    }
    defer keyFile.Close()


    if err := pem.Encode(keyFile, &pem.Block{Type: "PRIVATE KEY", Bytes: privBytes}); err != nil {
        log.Fatalf("Failed to write private key: %v", err)
    }
}
Our certificate is saved. The next step is verifying whether the server and client use the specified quantum-proof key encapsulation mechanism.
Read also
Preparing Your Software for Post-Quantum Cryptography: A Practical Guide to Crypto-Agility
Learn how to prepare your business for a post-quantum future by making your product crypto-agile. We discuss best practices and steps to making your software adaptable to future threats.

Step 2. Create PQC verification functions
To check if we implemented PQC correctly, we need to implement several simple functions.
The developers of Golang 1.23 added a testingOnlyCurveID field for debugging purposes. Although this field is not public, we can access it using the capabilities of the standard library’s reflect package. Below is the code for the GetTestingOnlyCurveID function, which performs this task:
package internal


import (
	"crypto/tls"
	"fmt"
	"log"
	"reflect"
	"unsafe"
)


func GetTestingOnlyCurveID(state *tls.ConnectionState) (*tls.CurveID, error) {
    v := reflect.ValueOf(state).Elem()
    field := v.FieldByName("testingOnlyCurveID")
    if !field.IsValid() {
        return nil, fmt.Errorf("field 'testingOnlyCurveID' does not exist")
    }
    field = reflect.NewAt(field.Type(), unsafe.Pointer(field.UnsafeAddr())).Elem()
    if curveId, ok := field.Interface().(tls.CurveID); ok {
        return &curveId, nil
    } else {
        return nil, fmt.Errorf("could not interpret 'testingOnlyCurveID' as tls.CurveID")
    }
}
Note! We don’t recommend using the reflect or unsafe libraries in real applications because they bypass Go’s type safety, reduce performance, and can introduce hard-to-debug errors. We use them only for demonstration purposes.
The testingOnlyCurveID field is not the only information we can obtain about the established connection. We can also verify the TLS version, the certificate’s digital signature algorithm, and more. To accomplish this, let’s implement a function that gathers and displays all information about the connection:
package internal
//...


// Golang 1.23 contains the x25519Kyber768Draft00 constant, but it is not public.
// So we have to define this constant in the file.
var X25519Kyber768Draft00 tls.CurveID = 0x6399


var CurveIDNames = map[tls.CurveID]string{
	tls.CurveP256:         "P-256",
	tls.CurveP384:         "P-384",
	tls.CurveP521:         "P-521",
	tls.X25519:            "X25519",
	X25519Kyber768Draft00: "X25519Kyber768Draft00",
}


var TLSVersionIDNames = map[uint16]string{
	0x0300: "SSL 3.0",
	0x0301: "TLS 1.0",
	0x0302: "TLS 1.1",
	0x0303: "TLS 1.2",
	0x0304: "TLS 1.3",
}


func ShowConnectionInfo(connState *tls.ConnectionState) {
    if curveId, err := GetTestingOnlyCurveID(connState); err == nil {
        log.Printf("Key exchanging algorithm: %s (0x%x)", CurveIDNames[*curveId], uint16(*curveId))
    }
    log.Printf("TLS version: %s (0x%x)", TLSVersionIDNames[connState.Version], connState.Version)
    log.Printf("Cipher suite: %s (0x%x)", tls.CipherSuiteName(connState.CipherSuite), connState.CipherSuite)
    log.Println("Peer certificates:")
    for _, cert := range connState.PeerCertificates {
        log.Printf("\tSubject: %s", cert.Subject)
        log.Printf("\tSignatureAlgorithm: %s", cert.SignatureAlgorithm)
    }
}
With these functions, we can verify that our server and client use the specified algorithms. Once verification is successful, we can start setting up our server.
Step 3. Set up the server
For server setup, we will use the standard Golang package net/http and the previously mentioned crypto/tls package.
First, we generate the certificates if they have not been generated before:
package internal
//...


// Golang 1.23 contains the x25519Kyber768Draft00 constant, but it is not public.
// So we have to define this constant in the file.
var X25519Kyber768Draft00 tls.CurveID = 0x6399


var CurveIDNames = map[tls.CurveID]string{
	tls.CurveP256:         "P-256",
	tls.CurveP384:         "P-384",
	tls.CurveP521:         "P-521",
	tls.X25519:            "X25519",
	X25519Kyber768Draft00: "X25519Kyber768Draft00",
}


var TLSVersionIDNames = map[uint16]string{
	0x0300: "SSL 3.0",
	0x0301: "TLS 1.0",
	0x0302: "TLS 1.1",
	0x0303: "TLS 1.2",
	0x0304: "TLS 1.3",
}


func ShowConnectionInfo(connState *tls.ConnectionState) {
    if curveId, err := GetTestingOnlyCurveID(connState); err == nil {
        log.Printf("Key exchanging algorithm: %s (0x%x)", CurveIDNames[*curveId], uint16(*curveId))
    }
    log.Printf("TLS version: %s (0x%x)", TLSVersionIDNames[connState.Version], connState.Version)
    log.Printf("Cipher suite: %s (0x%x)", tls.CipherSuiteName(connState.CipherSuite), connState.CipherSuite)
    log.Println("Peer certificates:")
    for _, cert := range connState.PeerCertificates {
        log.Printf("\tSubject: %s", cert.Subject)
        log.Printf("\tSignatureAlgorithm: %s", cert.SignatureAlgorithm)
    }
}
The next step is the most important to turn on the post-quantum key encapsulation mechanism. We need to define the TLS configurations, which will specify:
- Use only TLS 1.3 and deny any downgrade attempts.
- Specify only the X25519Kyber768Draft00 (0x6399) ID as the preferred algorithm for the key exchange procedure.
In the Go code, it appears as follows:
func main() {
    //…
    tlsConfig := tls.Config{
        MinVersion: tls.VersionTLS13,
        CurvePreferences: []tls.CurveID{internal.X25519Kyber768Draft00},
    }
    //…
}
The final step is to create the server instance with the selected TLS configuration, port, and endpoint to respond:
func main() {
    //…
    mux := http.NewServeMux()
    mux.HandleFunc("/", handler)


    srv := &http.Server{
        Addr:    ":1443",
        Handler: mux,
        TLSConfig: tlsConfig,
    }


    log.Printf("Starting server on %s\n", srv.Addr)
    log.Fatal(srv.ListenAndServeTLS(certName, keyName))
}


func handler(w http.ResponseWriter, r *http.Request) {
    log.Printf("Received a new request from %#v", r.RemoteAddr)
    internal.ShowConnectionInfo(r.TLS)


    response := "It is an Apriorit quantum-proof server. Hello world!\n"
    log.Printf("Response: %s", response)


    w.Write([]byte(response))
}
Step 4. Set up the client
To establish a secure connection using the post-quantum algorithm, the client should offer the quantum-proof algorithm in the ClientHello message. Therefore, we should specify X25519Kyber768Draft00 in the list of preferred key exchange algorithms within the TLS configuration. The following code contains the ready-to-use client:
import (
	"crypto/tls"
	"io"
	"log"
	"net/http"
	"Os"


       "apriorit.com/post-quantum/internal"
)


func main() {
    if len(os.Args) != 2 {
        log.Printf("Usage: go run ./client/client.go <URL>")
        return
    }


    tlsConfig := tls.Config{
        MaxVersion:      tls.VersionTLS13,
        CurvePreferences: []tls.CurveID{internal.X25519Kyber768Draft00},
        InsecureSkipVerify: true,
    }


    client := &http.Client{
        Transport: &http.Transport{
            TLSClientConfig: &tlsConfig,
        },
    }


    url := os.Args[1]
    response, err := client.Get(url)
    if err != nil {
        log.Fatalf("Failed to make request: %v", err)
    }
    defer response.Body.Close()


    internal.ShowConnectionInfo(response.TLS)


    body, err := io.ReadAll(response.Body)
    if err != nil {
        log.Println("Error reading response body:", err)
        return
    }


    log.Println("Response status from server:", response.Status)
    log.Println("Response body:", string(body))
}
Now that our client is ready, let’s launch it and check if our integration of post-quantum cryptography is in place.
Read also
6 Emerging Cybersecurity Trends for Software Development in 2025 to Futureproof Your Product
Explore the latest cybersecurity strategies and technologies that will help you protect your digital products in 2024 and beyond in our expert guide.

Step 5. Launch the server and client
Now, let’s run the server and client. The server is waiting for a request.

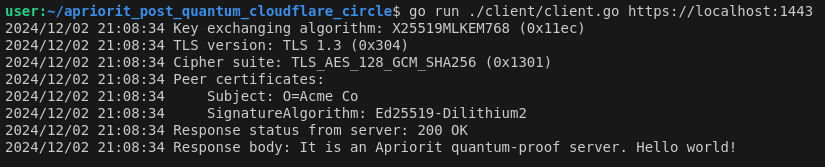
The client sends a request and gets a response:
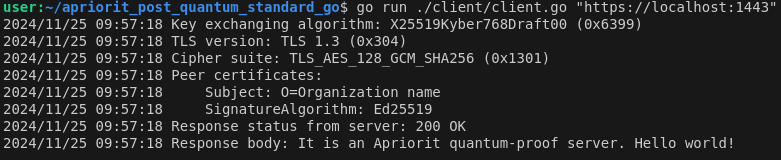
As we can see in the output, the connection is successfully established as expected:
- The TLS version is 1.3.
- We use the post-quantum X25519Kyber768Draft00 key exchanging algorithm, which complies with the NIST standard FIPS 203.
- The server and client encrypt and decode the request body with a symmetric TLS_AES_128_GCM_SHA256 encryption cipher.
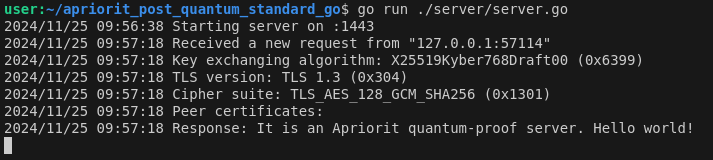
In the server logs, we can observe similar information:
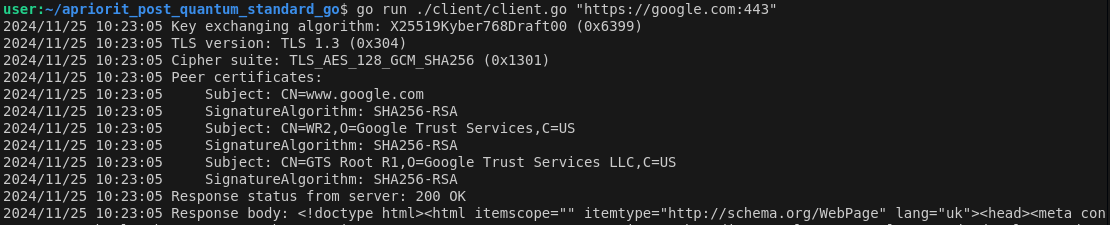
Additionally, the provided client is allowed to access external servers, which also support X25519Kyber768KyberDraft00. For example:
While Golang currently has limited support for post-quantum algorithms, there are alternative methods for creating quantum-resistant code. Let’s look at them.
Using the Cloudflare CIRCL library
Cloudflare is one of the companies that actively researches and experiments with post-quantum encryption algorithms. Their community maintains several open-source repositories that provide the ability to use post-quantum algorithms in code:
- CIRCL is a collection of cryptographic primitives written in Go that includes experimental deployment of post-quantum cryptographic algorithms.
- cfgo is an actively maintained fork of Golang that integrates CIRCL natively into Go.
The mentioned repositories contain appropriate architecture and post-quantum algorithms suitable for key exchange and digital signature creation. These repositories contain algorithms associated with NIST standards:
- FIPS 203 (ML-KEM): Hybrid key exchanging algorithms X25519MLKEM768, X25519Kyber512Draft00, X25519Kyber768Draft00, and P256Kyber768Draft00
- FIPS 204 (ML-DSA): Some variants of the Dilithium algorithms: Dilithium2, Dilithium3, Dilithium5. Also, there are hybrid versions that combine the Ed25519 + Dilithium algorithms: EdDilithium2, EdDilithium3
- FIPS 205 (SLH-DSA): The CIRCL library community actively develops the appropriate set of algorithms for the FIPS 205 standard, but unfortunately, no released digital signature algorithms for this standard exist.
In this article, we demonstrate the server–client setup based on cfgo v1.22.5 with CIRCL v1.4.1.
To prepare the environment, we will use information from the README file of the cfgo repository.
Step 1. Generate a certificate
First, let’s create a certificate using a quantum-resistant algorithm such as Ed25519-Dilithium2 or Ed448-Dilithium3. For this, we’ll use the simple generate_cert.go script from the cfgo repository.

Then we can place the generated cert.pem and key.pem files in a directory accessible to the server and launch the server.
Related project
Improving a SaaS Cybersecurity Platform with Competitive Features and Quality Maintenance
Learn how we implemented new features in a low-level vulnerability detection engine and improved the platform’s stability and user experience.

Step 2. Create PQC verification functions
Now, let’s create functions that will allow us to verify if we used a PQC key exchange algorithm in our solution. The process will be different from our previous example, as Golang version 1.22.5 doesn’t include the testOnlyCurveID variable that we saw in the Golang version 1.23. However, we can access the selected CurveID with another mechanism provided by cfgo.
We can use a cfEventHandler field from cfgo’s Connection structure to handle events during the handshake procedure. Setting the selected key exchange algorithm is part of these events.
To specify the event handler, we need to create a request object and provide the context with the function that processes the event. The following function will cover our requirements for monitoring which key exchange algorithm has been used:
import (
	"context"
	"crypto/tls"
	"log"
	"net/http"


       "apriorit.com/post-quantum/internal"
)


 func createVerboseRequest(url string) (*http.Request, error) {
    return http.NewRequestWithContext(
        context.WithValue(
            context.Background(),
            tls.CFEventHandlerContextKey{},
            func(ev tls.CFEvent) {
                if val, ok := ev.(tls.CFEventTLS13NegotiatedKEX); ok {
                    algorithm := internal.CurveIDNames[val.KEX]
                    log.Printf("Key exchanging algorithm: %s (0x%x)", algorithm, uint16(val.KEX))
                }
            },
        ),
        "GET",
        url,
        nil,
    )
}
Here we check the event type, and if it is the expected CFEventTLS13NegotiatedKEX, we log information about the chosen algorithm.
Step 3. Set up the server
The server code includes minor modifications related to the TLS configuration. Cfgo contains more post-quantum algorithms, and we can use any of them without complications. For example, let’s use the familiar X25519MLKEM768.
tlsConfig := &tls.Config{
    MinVersion:    tls.VersionTLS13,
    CurvePreferences: []tls.CurveID{tls.X25519MLKEM768},
}
The full server code looks like this:
import (
	"crypto/tls"
	"log"
	"net/http"


       "apriorit.com/post-quantum/internal"
)
 func main() {
    var (
        certName = "cert.pem"
        keyName  = "key.pem"
    )

    tlsConfig := &tls.Config{
        MinVersion:    tls.VersionTLS13,
        CurvePreferences: []tls.CurveID{tls.X25519MLKEM768},
    }

    mux := http.NewServeMux()
    mux.HandleFunc("/", handler)

    srv := &http.Server{
        Addr:    ":1443",
        Handler: mux,
        TLSConfig: tlsConfig,
    }

    log.Printf("Starting server on %s\n", srv.Addr)
    srv.ListenAndServeTLS(certName, keyName)
}


func handler(w http.ResponseWriter, r *http.Request) {
    log.Printf("Received a new request from %#v", r.RemoteAddr)
    internal.ShowConnectionInfo(r.TLS)


    response := "It is an Apriorit quantum-proof server. Hello world!\n"
    log.Printf("Response: %s", response)


    w.Write([]byte(response))
}
Step 4. Set up the client
The client has several changes compared to our Golang 1.23 example.
1. Updated TLS configuration
In the tls.Config we should also specify the same tls.X25519MLKEM768 algorithm our server expects for the key exchange mechanism.
tlsConfig := tls.Config{
    MaxVersion:             tls.VersionTLS13,
    CurvePreferences:       []tls.CurveID{tls.X25519MLKEM768},
    InsecureSkipVerify:     true,
    PQSignatureSchemesEnabled: true,
}
An almost invisible but very important change is the addition of the PQSignatureSchemesEnabled variable, which enables the use of new post-quantum digital signature algorithms from CIRCL, such as Ed25519-Dilithium2 or Ed448-Dilithium3. If this variable is not specified, the client will be unable to verify the certificate, resulting in failure of the handshake procedure.
2. Request with a custom event handler
Next, we will use the already defined createVerboseRequest function to display the selected algorithm. The following code snippet demonstrates the changes:
func main() {
    //…
    url := os.Args[1]
    request, err := createVerboseRequest(url)
    if err != nil {
        log.Fatalf("Failed to create request: %v", err)
    }


    response, err := client.Do(request)
    if err != nil {
        log.Fatalf("Failed to make request: %v", err)
    }
    //…
}
The full client code looks like this:
package main


import (
	"context"
	"crypto/tls"
	"io"
	"log"
	"net/http"
	"Os"
       "apriorit.com/post-quantum/internal"
)


func createVerboseRequest(url string) (*http.Request, error) {
    return http.NewRequestWithContext(
        context.WithValue(
            context.Background(),
            tls.CFEventHandlerContextKey{},
            func(ev tls.CFEvent) {
                if val, ok := ev.(tls.CFEventTLS13NegotiatedKEX); ok {
                    algorithm := internal.CurveIDNames[val.KEX]
                    log.Printf("Key exchanging algorithm: %s (0x%x)", algorithm, uint16(val.KEX))
                }
            },
        ),
        "GET",
        url,
        nil,
    )
}


func main() {
    if len(os.Args) != 2 {
        log.Printf("Usage: go run ./client/client.go <URL>")
        return
    }


    tlsConfig := tls.Config{
        MaxVersion:             tls.VersionTLS13,
        CurvePreferences:       []tls.CurveID{tls.X25519MLKEM768},
        InsecureSkipVerify:     true,
        PQSignatureSchemesEnabled: true,
    }


    client := &http.Client{
        Transport: &http.Transport{
            TLSClientConfig: &tlsConfig,
        },
    }


    url := os.Args[1]
    request, err := createVerboseRequest(url)
    if err != nil {
        log.Fatalf("Failed to create request: %v", err)
    }


    response, err := client.Do(request)
    if err != nil {
        log.Fatalf("Failed to make request: %v", err)
    }
    defer response.Body.Close()


    internal.ShowConnectionInfo(response.TLS)


    body, err := io.ReadAll(response.Body)
    if err != nil {
        log.Println("Error reading response body:", err)
        return
    }


    log.Println("Response status from server:", response.Status)
    log.Println("Response body:", string(body))
}
We have successfully configured a post-quantum TLS client to negotiate secure connections and verify server certificates with PQC algorithms.
Step 5. Launch the server and client
Now let’s run the code and check if the results match our expectations. The server is open for a connection:

The client sends a request, and the handshake procedure is finished successfully:
As we can see from the output, the connection is established as expected:
- The server and client negotiate using the X25519MLKEM768 algorithm from the CIRCL library.
- The certificate with the Ed25519-Dilithium digital signature algorithm successfully passes client verification.
- The response is successfully decoded.
Let’s check our server–client connection:
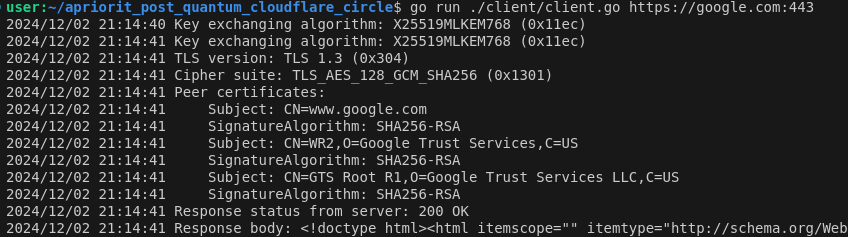
As you can see, our client is able to establish a connection with a real-world server.
Read also
Internal Security Audit Checklist for Increasing Product Quality
Get an internal security audit checklist based on decades of Apriorit’s experience in the cybersecurity field to ensure the protection and quality of your product.

Using the Liboqs library
Liboqs offers a comprehensive collection of cryptographic algorithms, including post-quantum ones, primarily intended for research and experimentation rather than immediate use in production systems. As a result, integrating Liboqs into a project typically requires additional development effort and custom implementations tailored to specific needs.
In the following code, we will not satisfy all requirements of the TLS 1.3 protocol, as it may be initiated as an independent project. However, the code will have enough content to show the use of post-quantum algorithms for negotiating the shared secret key and verifying the certificate.
To achieve our goal, we should pay attention to some key Liboqs components:
- Listener is responsible for creating new connections to the server. It functions like a door concierge for our server, so all control measures should be applied here. Our listener will process post-quantum keys.
- Dialer is responsible for connecting to the specified server. Usually, it opens an unencrypted TCP connection; however, we can implement our own security mechanisms here, such as post-quantum key exchange.
- Connection is a stream-oriented component that provides read-write operations for communication between two peers. Since both Listener and Dialer produce Connection objects, it is a convenient place to apply data encryption and decryption using the agreed-upon key. Here, we will store the shared secret key that was established during the post-quantum key exchange procedure.
Step 1. Generate the certificate
The standard crypto/x509 package allows us to create a certificate only with a limited list of well-known algorithms such as RSA and ED25519. To generate an X.509 certificate, you would either need to wait a long time for official support or implement the functionality yourself.
Fortunately, the famous and widely used OpenSSL toolkit allows for integrating the full-featured abilities of Liboqs. We can use it to generate a certificate with a quantum-proof digital signature.
Liboqs requires OpenSSL version 3+ (specifically, its “providers” feature). Liboqs contributors created the Open Quantum Safe provider for OpenSSL (oqsprovider) repository to wrap the algorithms in the expected OpenSSL format. Let’s install them using the following instructions:
Once both are installed, we can use them to generate a certificate. Below is a command for generating a certificate with Dilithium2.
openssl req -x509 -new -newkey dilithium2 -keyout dilithium2_key.pem -out dilithium2_cert.pem -nodes -days 365 -provider oqsprovider -provider default -subj "/O=Apriorit/CN=pq_apriorit_article.com"As a result, we get the file dilithium2_cert.pem with a certificate signed with the Dilithium2 digital signature post-quantum algorithm:

Step 2. Create a PQC verification function
Even though we do not fully follow the TLS 1.3 procedure and have implemented its simplified proof of concept version, nothing prevents us from creating a component for certificate verification.
Let’s implement a function that will verify the input certificate:
import (
	"crypto/x509"
	"crypto/x509/pkix"
	"encoding/asn1"
	"encoding/pem"
	"fmt"
	"log"
	"os"


	"github.com/open-quantum-safe/liboqs-go/oqs"
)


 func verifyPostQuantumCertificate(certData []byte) error {
    block, _ := pem.Decode(certData)
    if block == nil || block.Type != "CERTIFICATE" {
        return fmt.Errorf("failed to decode certificate")
    }
    cert, err := x509.ParseCertificate(block.Bytes)
    if err != nil {
        return err
    }
    // Extract the digital signature-related data to verify certificate
    publicKeyBytes := cert.RawSubjectPublicKeyInfo
    signature := cert.Signature
    tbsData := cert.RawTBSCertificate
    // Initialize the Liboqs Dilithium2 signature verifier
    verifier := oqs.Signature{}
    defer verifier.Clean()
    err = verifier.Init("Dilithium2", nil)
    if err != nil {
        return err
    }
    // Extract the Dilithium2 public key from the certificate
    spki := ASN1SubjectPublicKeyInfo{}
    _, err = asn1.Unmarshal(cert.RawSubjectPublicKeyInfo, &spki)
    if err != nil {
        return fmt.Errorf("failed to parse public key info: %v", err)
    }
    publicKeyBytes = spki.PublicKey.Bytes


    valid, err := verifier.Verify(tbsData, signature, publicKeyBytes)
    if err != nil || !valid {
        log.Println("Signature verification failed")
        return err
    } else {
        log.Println("Signature successfully verified using Dilithium2")
    }
    return nil
}
This function accepts a certificate as a slice of bytes and performs Dilithium2 signature verification with the liboqs library.
We can use this function to verify our previously created certificate in the following manner:
func main() {
    if len(os.Args) != 2 {
        log.Fatalf("Usage: %s <cert_file_path>", os.Args[0])
    }
    cert_path := os.Args[1]
    certData, err := os.ReadFile(cert_path)
    if err != nil {
        log.Fatalf("error reading certificate: %v", err)
    }
    err = verifyPostQuantumCertificate(certData)
    if err != nil {
        log.Fatalf("error verifying signature: %v", err)
    }
}
As a result, we confirm that the certificate is valid:

Step 3. Establishing a secure connection
As we do not use the TLS from the standard Golang crypto package and have customized the connection creation process, we must ensure the connection’s security ourselves.
Note! The following code contains detailed logs only for demonstration purposes. We do not recommend writing confidential data, such as keys, into log messages.
Here is the code for the PQConnection object, which uses the agreed shared secret key to encrypt and decrypt the data and provides the net.Conn interface for communication.
package internal


import (
	"crypto/aes"
	"crypto/cipher"
	"io"
	"net"
	"log"
)


 type PQConnection struct {
    net.Conn
    sharedSecretKey []byte
    cipher          cipher.Stream
}


func NewPQConnection(baseConn net.Conn, secretKey []byte) (*PQConnection, error) {
    aesCipherBlock, err := aes.NewCipher(secretKey[:32])
    if err != nil {
        return nil, err
    }
    chipher := cipher.NewCTR(aesCipherBlock, make([]byte, aesCipherBlock.BlockSize()))
    return &PQConnection{
        Conn:             baseConn,
        sharedSecretKey:  secretKey,
        cipher:          cipher,
    }, nil
}
The PQConnection structure stores the agreed key and initializes the stream cipher object. This object includes bound methods to satisfy the net.Conn interface.
func (p *PQConnection) Read(b []byte) (n int, err error) {
    n, err = p.Conn.Read(b)
    log.Printf("[PQConnection.Read] received encoded bytes: [% x] (string: %q)", b[:n], string(b[:n]))
    p.chipher.XORKeyStream(b[:n], b[:n])
    log.Printf("[PQConnection.Read] decoded bytes: [% x] (string: %q)", b[:n], string(b[:n]))
    log.Printf("[PQConnection.Read] processed %v bytes, err=%v", n, err)
    return
}


func (p *PQConnection) Write(b []byte) (n int, err error) {
    c := make([]byte, len(b))
    log.Printf("[PQConnection.Write] input bytes: [% x] (string: %q)", b, string(b))
    p.chipher.XORKeyStream(c, b)
    n, err = p.Conn.Write(c)
    log.Printf("[PQConnection.Write] encoded bytes: [% x] (string: %q)", c, string(c))
    if n != len(b) && err == nil {
        err = io.ErrShortWrite
    }
    log.Printf("[PQConnection.Write] %v bytes written, err=%v", n, err)
    return
}


func (p *PQConnection) Close() error {
    return p.Conn.Close()
}
Read also
Building a Transparent Encryption Framework to Secure Android Applications: A Step-by-Step Guide
Protect your users’ sensitive data in your application. Learn how to make the encryption process reliable and convenient and safeguard data on rooted Android devices.

Step 4. Set up the server
As previously described, we should implement a custom listener that performs quantum-proof key exchange and provides secure open connections for HTTP server processing.
The LiboqsListener is a wrapper for the default network listener that adds the post-quantum key exchange procedure. Its main tasks include:
- Accepting a new connection request
- Receiving the Kyber512 public key from the client
- Returning the encrypted shared secret to the client
- Returning an initialized PQConnection object to the server
package main


import (
	"fmt"
	"io"
	"log"
	"net"
	"net/http"


	"github.com/open-quantum-safe/liboqs-go/oqs"
       "apriorit.com/post-quantum/internal"
)


// Performs post-quantum key exchange to establish a secure connection
// Implements the net.Listener interface
type LiboqsListener struct {
    net.Listener
    kem oqs.KeyEncapsulation
}


func NewLiboqsListener(algName, addr string) (*LiboqsListener, error) {
    kem := oqs.KeyEncapsulation{}
    if err := kem.Init(algName, nil); err != nil {
        return nil, err
    }
    baseListener, err := net.Listen("tcp", addr)
    if err != nil {
        return nil, err
    }
    return &LiboqsListener{
        Listener: baseListener,
        kem:      kem,
    }, nil
}


func (l *LiboqsListener) Accept() (net.Conn, error) {
    conn, err := l.Listener.Accept()
    if err != nil {
        conn.Close()
        return nil, err
    }
    log.Printf("[LiboqsListener.Accept] Accepted a new connection from %v", conn.RemoteAddr())


    clientPublicKey := make([]byte, l.kem.Details().LengthPublicKey)
    n, err := io.ReadFull(conn, clientPublicKey)
    if err != nil {
        conn.Close()
        log.Fatal(err)
    } else if n != l.kem.Details().LengthPublicKey {
        conn.Close()
        log.Fatal("[LiboqsListener.Accept] Server expected to read %s bytes, but instead read %s", l.kem.Details().LengthPublicKey, n)
    }


    log.Printf("[LiboqsListener.Accept] Received client public key: [%x ...] , len=%v]", clientPublicKey[:8], len(clientPublicKey))


    encapsulatedSharedSecret, sharedSecret, err := l.kem.EncapSecret(clientPublicKey)
    log.Printf("[LiboqsListener.Accept] Prepared shared secret: [%x ...] , len=%v]", sharedSecret[:8], len(sharedSecret))


    n, err = conn.Write(encapsulatedSharedSecret)
    if err != nil {
        conn.Close()
        return nil, err
    } else if n != l.kem.Details().LengthCiphertext {
        return nil, fmt.Errorf("[LiboqsListener.Accept] Server expected to write %s bytes, but instead wrote %s", l.kem.Details().LengthPublicKey, n)
    }


    log.Printf("[LiboqsListener.Accept] Sent encapsulated shared secret: [%x ...] , len=%v]", encapsulatedSharedSecret[:8], len(encapsulatedSharedSecret))


    pqConn, err := internal.NewPQConnection(conn, sharedSecret)
    if err != nil {
        conn.Close()
        return nil, err
    }
    log.Printf("[LiboqsListener.Accept] Established a new post-quantum secure connection with %v", pqConn.RemoteAddr())
    return pqConn, nil
}
The LiboqsListener serves as the foundation for enabling post-quantum secure communication and can be seamlessly integrated with http.Server from Go’s standard net/http package to enhance the security of HTTPS connections against quantum computing threats.
func handler(w http.ResponseWriter, r *http.Request) {
    log.Printf("Received a new request from %v", r.RemoteAddr)
    response := "It is an Apriorit quantum-proof server. Hello world!\n"
    log.Printf("Response: %s", response)

    w.Write([]byte(response))
}


func main() {
    var (
        algorithmName = "Kyber512"
        address       = ":1443"
    )


    server := &http.Server{
        Handler: http.HandlerFunc(handler),
    }


    listener, err := NewLiboqsListener(algorithmName, address)
    if err != nil {
        log.Fatalf("Failed to create PQ listener: %s", err)
    }


    log.Printf("Starting post-quantum secure HTTP server on %s using %s", address, algorithmName)
    if err := server.Serve(listener); err != nil {
        log.Fatalf("Server error: %s", err)
    }
}
Step 5. Set up the client
As the Listener accepts new connections, the client’s Dialer establishes connections with the server. Here, we define a custom DialContext that includes the following actions:
- Establish a basic connection with the server
- Generate a Kyber512 key pair
- Send the public key to the server
- Receive the encrypted shared secret
- Decrypt the shared secret using a private key
- Return the initialized PQConnection object
package main


import (
	"context"
	"io"
	"log"
	"net"
	"net/http"


	"github.com/open-quantum-safe/liboqs-go/oqs"


	"apriorit.com/post-quantum-poc/internal"
)


func LiboqsDialContext(ctx context.Context, network, address string) (net.Conn, error) {
    conn, err := net.Dial(network, address)
    if err != nil {
        return nil, err
    }


    log.Printf("[LiboqsDialContext] Connected to server, starting post-quantum handshake...")


    kem := oqs.KeyEncapsulation{}
    if err := kem.Init("Kyber512", nil); err != nil {
        return nil, err
    }


    clientPublicKey, err := kem.GenerateKeyPair()
    if err != nil {
        return nil, err
    }


    log.Printf("[LiboqsDialContext] Generated client public key: [%x ...] , len=%v]", clientPublicKey[:8], len(clientPublicKey))


    if _, err := conn.Write(clientPublicKey); err != nil {
        return nil, err
    }


    encryptedSharedSecret := make([]byte, kem.Details().LengthCiphertext)
    if _, err := io.ReadFull(conn, encryptedSharedSecret); err != nil {
        return nil, err
    }


    log.Printf("[LiboqsDialContext] Received encapsulated shared secret: [%x ...] , len=%v]", encryptedSharedSecret[:8], len(encryptedSharedSecret))


    sharedSecret, err := kem.DecapSecret(encryptedSharedSecret)
    if err != nil {
        return nil, err
    }


    log.Printf("[LiboqsDialContext] Decapsulated shared secret: [%x ...] , len=%v]", sharedSecret[:8], len(sharedSecret))


    pqConn, err := internal.NewPQConnection(conn, sharedSecret)
    if err != nil {
        conn.Close()
    }


    return pqConn, err
}
Now we can establish this function as one of the key components of the standard http.Client.
func main() {
    var (
        url = "http://localhost:1443"
    )


    client := &http.Client{
        Transport: &http.Transport{
            DialContext: LiboqsDialContext,
        },
    }


    response, err := client.Get(url)
    if err != nil {
        log.Fatalf("Request failed: %v", err)
    }
    defer response.Body.Close()


    body, err := io.ReadAll(response.Body)
    if err != nil {
        log.Fatalf("Failed to read response: %v", err)
    }


    log.Printf("Response: %s\n", body)
}
Our client is ready.
Step 6. Launch the server
Finally, let’s launch our server.

The client makes a request and gets an expected response.
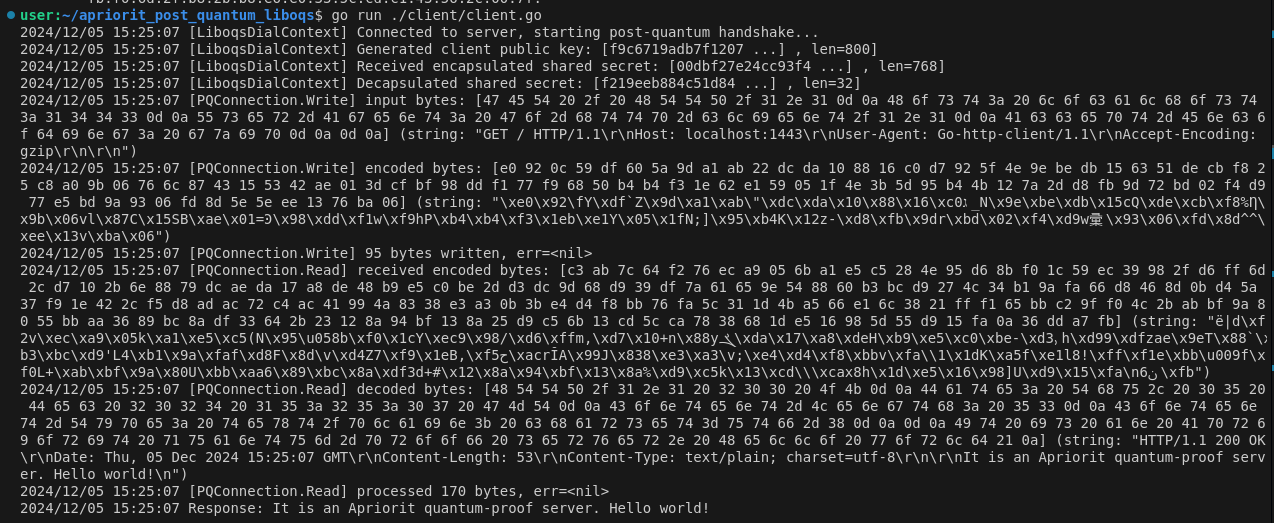
The server also produces detailed output:

We can see details of the client–server communication:
- The simplified handshake procedure uses the post-quantum Kyber512 algorithm.
- The client and server agree to use the shared secret for symmetric AES-256 data encryption.
- The data encryption and decryption processes are successful, and the response is decoded correctly.
PQC algorithm performance comparison
Let’s evaluate the performance of the provided post-quantum solutions and the non post-quantum standard server that uses the well-known X25519 algorithm. We won’t include our Liboqs solution in this comparison, as it’s currently available only for research purposes and can’t communicate with external servers.
Here’s a comparison of three key exchange algorithms, showing the average time they take to complete a single request based on 100 test requests.
Table 1. Key exchange algorithm comparison
| Scenario | Non post-quantum (X25519) | Go 1.23 Post-quantum (X25519Kyber768Draft00) | Cloudflare Post-quantum (X25519MLKEM768) |
|---|---|---|---|
| Localhost | 3.3 ms | 3.9 ms | 4.3 ms |
| https://google.com:443 | 1.0 s | 1.1 s | 1.33 s |
| https://pq.cloudflareresearch.com/ | 0.18 s | 0.22 s | 0.2 s |
As you can see, on localhost, the post-quantum algorithms introduce a minor latency increase of 0.6 to 1.0 milliseconds compared to X25519. Over external connections, such as Google or Cloudflare’s research server, the latency difference becomes less noticeable due to the dominance of network delays, with post-quantum algorithms adding only a small overhead. This demonstrates that post-quantum algorithms are practical for use while incurring minimal performance trade-offs.
Conclusion
Although quantum computers aren’t widely available yet, the quantum threat is closer than it may seem. Now is the time to start preparing your software to withstand these future challenges. Modern post-quantum cryptographic algorithms are already available and can be integrated into existing systems, enabling organizations to build quantum-resistant solutions today.
By ensuring your software is flexible and crypto-agile, you can seamlessly adopt PQC algorithms as they become standardized and protect your sensitive data from potential quantum attacks.
At Apriorit, our cybersecurity team is ready to assist you with integrating post-quantum cryptography and building quantum-resistant solutions, ensuring your software is protected from emerging threats and prepared for the future.
Need a reliable cybersecurity partner?
Leverage our security-first approach to software development and build future-proof products!