This article is a logical continuation of the Simple SST Unhooker article. This article is written as an answer to the article Driver to Hide Processes and Files. Second Edition: Splicing by Serg Bratus.
I will try to oppose the splicing method to remove all the hooks, which setting is described in his article.
Introduction
What is the best way of dealing with splicing in the context of struggle with hidden processes? Obviously, the best way is to verify the whole ntoskernel image entirely.
The verification of the loaded (original) image with a file is provided in the previous article. But I analyzed only a part of ntoskernel – sdt / sst – there. It is possible to expand the functionality of the previous driver so that it passes through all the sections and verifies them, as the windbg !chkimg extension does:
“The !chkimg extension detects corruption in the images of executable files by comparing them to the copy on a symbol store or other file repository.” (for more information, see http://msdn.microsoft.com/en-us/library/ff562217(v=vs.85).aspx).
In fact, we need to write something similar. We can use memory mapped files, just like I did in the previous article to compare the loaded ntoskernel with the file. The easiest way is to take the old driver as a basis and add the necessary functionality to it. As far as the executing ntoskernel.exe system is a standard PE file, the verification algorithm will repeat some actions of the PE loader.
PE loader works section by section as follows:
“It’s important to note that PE files are not just mapped into memory as a single memory-mapped file. Instead, the Windows loader looks at the PE file and decides what portions of the file to map in. This mapping is consistent in that higher offsets in the file correspond to higher memory addresses when mapped into memory. The offset of an item in the disk file may differ from its offset once loaded into memory. However, all the information is present to allow you to make the translation from disk offset to memory offset (see Figure 1).” (for more information, see http://msdn.microsoft.com/en-us/magazine/cc301805.aspx)
That’s why we have to verify the file section by section too.
PE format is well described in the article mentioned above, so I will not describe it entirely. I will describe it only from a practical point of view.
The PE file section is described by such structure:
#define IMAGE_SIZEOF_SHORT_NAME              8
typedef struct _IMAGE_SECTION_HEADER {
    BYTE    Name[IMAGE_SIZEOF_SHORT_NAME];
    union {
            DWORD   PhysicalAddress;
            DWORD   VirtualSize;
    } Misc;
    DWORD   VirtualAddress;
    DWORD   SizeOfRawData;
    DWORD   PointerToRawData;
    DWORD   PointerToRelocations;
    DWORD   PointerToLinenumbers;
    WORD    NumberOfRelocations;
    WORD    NumberOfLinenumbers;
    DWORD   Characteristics;
} IMAGE_SECTION_HEADER, *PIMAGE_SECTION_HEADER;
The next figure illustrates the way of using its fields:

Figure 1. PE header. Section on the disk and in the memory
As it is shown in figure 1, the virtual addresses describe the section after loading, and the physical (raw) addresses describe the section on the disk. We have to know how to translate virtual addresses into physical ones to compare the section on the disk and in the memory.
You can do this as follows:
// This function converts virtual address to raw
static
ULONG ConvertVAToRaw(PIMAGE_NT_HEADERS pNtHeaders,
                     ULONG virtualAddr)
{
    PIMAGE_SECTION_HEADER pSectionHeader = (PIMAGE_SECTION_HEADER)((char*)&(pNtHeaders->FileHeader)+
                                                            pNtHeaders->FileHeader.SizeOfOptionalHeader+
                                                            sizeof(IMAGE_FILE_HEADER));
    // scanning all sections
    for(int i=0;i < pNtHeaders->FileHeader.NumberOfSections;i++, ++pSectionHeader)
    {
        if ((virtualAddr >= pSectionHeader->VirtualAddress) &&
            (virtualAddr <  pSectionHeader->VirtualAddress + pSectionHeader->Misc.VirtualSize))
        {
            // skip empty sections
            if (!pSectionHeader->SizeOfRawData)
                return 0;
            ULONG va = pSectionHeader->VirtualAddress;
            ULONG raw = pSectionHeader->PointerToRawData;
            return virtualAddr - va + raw;
        }
    }
    return 0;
}
We will use this function in future because it is virtual addresses that are used in all PE tables.
Relocs
If we just map the file and try to compare it with the loaded image, relocations are the first problem we meet.
Here is the thing: the code, which is saved on the disk, stores all the absolute addresses as relative to the ImageBase value from the OptionalHeader of the PE file.
For example, the function from ntoskernel, which is just mapped in the memory, can look as follows:
00050a71 8bff             mov     edi,edi
00050a73 55               push    ebp
00050a74 8bec             mov     ebp,esp
00050a76 51               push    ecx
00050a77 6a01             push    0x1
00050a79 8d450c           lea     eax,[ebp+0xc]
00050a7c 50               push    eax
00050a7d ff7508           push    dword ptr [ebp+0x8]
00050a80 b910794500       mov     ecx,0x457910         // here
00050a85 6a03             push    0x3
00050a87 6a65             push    0x65
00050a89 e8ef210c00       call    00112c7d
00050a8e 59               pop     ecx
00050a8f 5d               pop     ebp
00050a90 c3               ret
The absolute address is moved to ECX in this function:
00050a80 b910794500 mov ecx,0x457910 // *** and it is relative to ImageBaseWe can view the value of the ImageBase image by the lm + dh commands:
kd> lm
start    end        module name
82602000 82a12000   nt         (pdb symbols)

kd> !dh 82602000
File Type: EXECUTABLE IMAGE
FILE HEADER VALUES
     14C machine (i386)
      16 number of sections
4A5BC007 time date stamp Tue Jul 14 02:15:19 2009
… skipped
OPTIONAL HEADER VALUES
     10B magic #
    9.00 linker version
  343000 size of code
   C0000 size of initialized data
    2800 size of uninitialized data
  11D4D8 address of entry point
    1000 base of code
         ----- new -----
00400000 image base          /// IT IS!
    1000 section alignment
     200 file alignment
       1 subsystem (Native)
    6.01 operating system version
    6.01 image version
    6.01 subsystem version
  410000 size of image
     800 size of headers
That is, image base is equal to 0x400000. If ntoskernel always loads at this address, the offset information is needless. But as far as ntoskernel usually loads to high addresses at some moduleAddress address, NT loader uses the information from the relocation table to transform relative offsets into the absolute ones.
The relocation table is stored in a special section of the PE file. It is a chain of records, each of which is described by the header IMAGE_BASE_RELOCATION:
typedef struct _IMAGE_BASE_RELOCATION {
    DWORD   VirtualAddress;
    DWORD   SizeOfBlock;
//  WORD    TypeOffsetSizeOfBlock[1];
} IMAGE_BASE_RELOCATION;
typedef IMAGE_BASE_RELOCATION UNALIGNED * PIMAGE_BASE_RELOCATION;
Each table entry has its own size, which is defined in the SizeOfBlock field. Also it has a dynamic array TypeOffsetSizeOfBlock. Each element of the TypeOffsetSizeOfBlock array describes one absolute offset in the file.
MSDN describes this structure as follows:
“Immediately following the IMAGE_BASE_RELOCATION structure is a variable number of WORD values. The number of WORDs can be deduced from the SizeOfBlock field. Each WORD consists of two parts. The top 4 bits indicate the type of relocation, as given by the IMAGE_REL_BASED_xxx values in WINNT.H. The bottom 12 bits are an offset, relative to the VirtualAddress field, where the relocation should be applied.” (for more information, see http://msdn.microsoft.com/en-us/magazine/cc301808.aspx).
Example
If we have such entry in the table:
VirtualAddress = 10000
SizeOfBlock = sizeof(IMAGE_BASE_RELOCATION)+4,
This means that two WORDs, which describe the offsets, follow it. Let it be such values:
offset1 = 3100
  offset2 = 3200
It means that the entry describes two absolute addresses, which are located at the 10100 and 10200 virtual addresses. Based on the type of offsets (in this case, it is IMAGE_REL_BASED_HIGHLOW(3)), loader will perform such actions to process the record:
LONG diff = moduleAddress - pNtHeaders->OptionalHeader.ImageBase;
*(LONG UNALIGNED *)(moduleAddress + offset1) += diff;
*(LONG UNALIGNED *)(moduleAddress + offset2) += diff;
We can visualize these actions as shown of the picture below:

Figure 2. Module before and after relocation processing.
We have to apply the relocations to our memory mapped image of ntoskernel in the same way as NT loader. It is important not to forget to translate virtual addresses from the table to the raw ones using the ConvertVAToRaw function, which is described above.
There is an interesting moment. If we use the same diff, which is used by the loader of the original image, we will get such image:

Figure 3. Our module after processing the relocations.
In this case, we will be able to compare sections even using the memcmp.
Function that adjusts all the relocations will look as follows:
static
NTSTATUS FixRelocs(void * pMappedImage,      // our mapped image
                   void * pLoadedNtAddress)  // original image in memory
{
    PIMAGE_NT_HEADERS pNtHeaders = RtlImageNtHeader( pMappedImage );
    ULONG oldBase = pNtHeaders->OptionalHeader.ImageBase;
    // scan for relocation section using RtlImageDirectoryEntryToData function:
    //
    //     PVOID
    //     RtlImageDirectoryEntryToData(
    //         IN PVOID Base,
    //         IN BOOLEAN MappedAsImage,
    //         IN USHORT DirectoryEntry,
    //         OUT PULONG Size
    //       );
    ULONG bytesCount = 0;
    PIMAGE_BASE_RELOCATION pRelocationEntry =
        (PIMAGE_BASE_RELOCATION)RtlImageDirectoryEntryToData((char*)pMappedImage,
                                                             FALSE,
                                                             IMAGE_DIRECTORY_ENTRY_BASERELOC,
                                                             &bytesCount);
    if (!pRelocationEntry)
    {
        // no relocations there
        return STATUS_NOT_FOUND;
    }
    // calculate the difference
    ULONG diff = (LONG)pLoadedNtAddress - (LONG)oldBase;
    while ((int)bytesCount > 0)
    {
        // process next entry
        bytesCount -= pRelocationEntry->SizeOfBlock;
        // parse offsets
        PUSHORT pFirstSubEntry =  (PUSHORT)((ULONG)pRelocationEntry +
sizeof(IMAGE_BASE_RELOCATION));
        int iSubEntriesCount  = (pRelocationEntry->SizeOfBlock –
sizeof(IMAGE_BASE_RELOCATION))/sizeof(USHORT);
        pRelocationEntry = ProcessRelocationEntry(pNtHeaders,
                                                  pMappedImage,
                                                  pRelocationEntry->VirtualAddress,
                                                  iSubEntriesCount,
                                                  pFirstSubEntry,
                                                  diff);
        if (!pRelocationEntry)
        {
            return STATUS_UNSUCCESSFUL;
        }
    }
    return STATUS_SUCCESS;
}
Where ProcessRelocationEntry is as follows:
static
PIMAGE_BASE_RELOCATION  ProcessRelocationEntry(PIMAGE_NT_HEADERS pNtHeaders,
                                               void * pMappedImage,
                                               ULONG virtualAddress,
                                               ULONG subEntriesCount,
                                               PUSHORT pSubEntry,
                                               LONG diff
                                               )
{
    for(int i = 0; i < subEntriesCount; ++i, ++pSubEntry)
    {
       USHORT offset = *pSubEntry & (USHORT)0xfff;
       ULONG rawTarget = (ULONG)ConvertVAToRaw(pNtHeaders, virtualAddress + offset);
       if (!virtualTarget)
       {
           continue;
       }
       // calculate the target inside our mapped image
       PUCHAR pTarget = (PUCHAR)pMappedImage + rawTarget;
       LONG tempVal = 0;
       // done it
       switch ((*pSubEntry) >> 12)
       {
            case IMAGE_REL_BASED_HIGHLOW :
                *(LONG UNALIGNED *)pTarget += diff;
                break;
            case IMAGE_REL_BASED_HIGH :
                tempVal = *(PUSHORT)pTarget << 16;
                tempVal += diff;
                *(PUSHORT)pTarget = (USHORT)(tempVal >> 16);
                break;
            case IMAGE_REL_BASED_ABSOLUTE :
                break;
            default :
                return NULL;
        }
    }
    return (PIMAGE_BASE_RELOCATION)pSubEntry;
}
After execution of the FixRelocs function, our loaded module will look like as in Figure 3.
Import table
We have only one task, except of the relocations. The task is to process the import tables.
Does Ntoskrnl import anything? Yes, it uses some modules. For example, in my Windows 7, they are as follows:
"PSHED.dll"
   "HAL.dll"
   "BOOTVID.dll"
   "KDCOM.dll"
   "CLFS.SYS"
   "CI.dll"
Obviously, this list can be different on different Windows versions.
The import table is well described in the Injective Code inside Import Table article and in other sources. That’s why I will not describe it here.
Let’s concentrate on the algorithm of import and export linking. The task on this step is to link the ntoskernel import table with the corresponding exported functions of other loaded modules.
This is the algorithm in a Nassi-Shneiderman diagram form (see http://en.wikipedia.org/wiki/Nassi%E2%80%93Shneiderman_diagram):
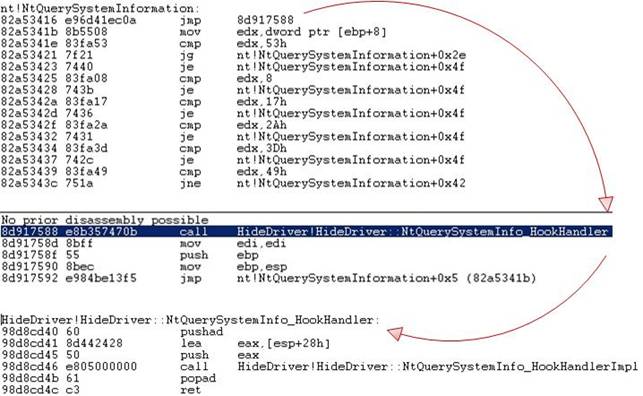
Figure 4. Algorithm of imported functions search
And this is its implementation:
static
NTSTATUS FixImports(Drv_Resolver * pResolver,
                    void * pMappedImage,
                    void * pLoadedNtAddress)
{
    PIMAGE_NT_HEADERS pNtHeaders = RtlImageNtHeader( pMappedImage );
    ULONG oldBase = pNtHeaders->OptionalHeader.ImageBase;
    // scan for import section
    ULONG bytesCount = 0;
    PIMAGE_IMPORT_DESCRIPTOR pImportEntry =
        (PIMAGE_IMPORT_DESCRIPTOR)RtlImageDirectoryEntryToData((char*)pMappedImage,
                                                             FALSE,
                                                             IMAGE_DIRECTORY_ENTRY_IMPORT,
                                                             &bytesCount);
    if (!pImportEntry)
    {
        // no imports there
        return STATUS_NOT_FOUND;
    }
    // process all import entries
    for (;pImportEntry->Name &&
     pImportEntry->FirstThunk; ++pImportEntry)
    {
        PCHAR pDllName = (PCHAR)pMappedImage + (ULONG)ConvertVAToRaw(pNtHeaders, pImportEntry->Name);
        PCHAR pFirstThunk = (PCHAR)pMappedImage + (ULONG)ConvertVAToRaw(pNtHeaders, pImportEntry->FirstThunk);
        SYSTEM_MODULE * pModule = pResolver->LookupModule(pDllName);
        if (!pModule)
        {
            continue;
        }
        // get module exports
        ULONG sizeOfExportTable = 0;
        PIMAGE_EXPORT_DIRECTORY pExport =
(PIMAGE_EXPORT_DIRECTORY)RtlImageDirectoryEntryToData(pModule->pAddress,
                                                                 TRUE,
                                                                 IMAGE_DIRECTORY_ENTRY_EXPORT,
                                                                 &sizeOfExportTable);
        // process all thunks
        PIMAGE_THUNK_DATA pThunk = (PIMAGE_THUNK_DATA)pFirstThunk;
        for(; pThunk->u1.AddressOfData; ++pThunk)
        {
            NTSTATUS status = LinkThunk(pModule,
                               pThunk,
                               pExport,
                               sizeOfExportTable,
                               pMappedImage,
                               pNtHeaders,
                               pLoadedNtAddress);
            NT_CHECK(status);
        }
    }
    return STATUS_SUCCESS;
}
The LinkThunk function task is to fill the u1.Function address value field for the thunk, with which it is called:
static
NTSTATUS LinkThunk(SYSTEM_MODULE * pModule,
                    PIMAGE_THUNK_DATA pThunk,
                    PIMAGE_EXPORT_DIRECTORY pExport,
                    ULONG sizeOfExportTable,
                    void * pMappedImage,
                    PIMAGE_NT_HEADERS pNtHeaders,
                    void * pLoadedNtAddress)
{
    USHORT ordinal = 0;
    if (IMAGE_SNAP_BY_ORDINAL(pThunk->u1.Ordinal))
    {
        ordinal = (ULONG)(IMAGE_ORDINAL(pThunk->u1.Ordinal) - pExport->Base);
    }
    else
    {
        // import by name
        ULONG oldAddressOfDataRaw = ConvertVAToRaw(pNtHeaders, pThunk->u1.AddressOfData);
        pThunk->u1.AddressOfData = (ULONG)pMappedImage + oldAddressOfDataRaw;
        NTSTATUS status = FindOrdinal(pModule,
                                      pThunk,
                                      pExport,
                                      &ordinal,
                                      sizeOfExportTable);
        if (!NT_SUCCESS(status))
            return status;
    }
    if (ordinal >= pExport->NumberOfFunctions)
        return STATUS_UNSUCCESSFUL;
    PULONG pAddressOfFunctions = (PULONG)((char *)pModule->pAddress + pExport->AddressOfFunctions);
    PCHAR pTargetFunction = (PCHAR)pModule->pAddress + pAddressOfFunctions[ordinal];
    pThunk->u1.Function = (ULONG)pTargetFunction;
    return STATUS_SUCCESS;
}
Finally, after this step, we can compare our loaded module with the original one in the very simple way:
static
NTSTATUS FindModificationInSection(Drv_VirginityContext2 * pContext,
                                   void ** ppStart,
                                   int * pSize)
{
    .... skipped code
        for(int i = 0;
        i < sizeInInts;
        ++i)
    {
        if (pOriginalSectionStartInt[i] != pMappedSectionStartInt[i])
        {
            if (!bInModification)
            {
                // we got the difference !!!!
                pContext->m_startOfModification = i*4;
                bInModification = 1;
            }
            continue;
        }
        else
        {
            // we got 4 equal bytes
            if (bInModification)
            {
                break;
            }
        }
    }
    .... skipped code
    return STATUS_SUCCESS;
}
In the sources, this function is slightly improved to find 1-byte differences.
Implementation
The API was implemented for checking Ntoskrnl integrity using all stuff described above:
NTSTATUS Drv_InitVirginityContext2(Drv_VirginityContext2 * pContext);
void Drv_FreeVirginityContext2(Drv_VirginityContext2 * pContext);
NTSTATUS Drv_GetFirstModification(Drv_VirginityContext2 * pContext,
                                void ** ppStart,
                                int * pSize);
NTSTATUS Drv_GetNextModification(Drv_VirginityContext2 * pContext,
                                void ** ppStart,
                                int * pSize);
It can be simply used:
virtual NTSTATUS ScanAllModule()
{
    void * pStart = 0;
    int size = 0;
    NT_CHECK(Drv_GetFirstModification(&m_virginityContext,
                        &pStart,
                        &size));
    while(pStart)
    {
        bool needBreak = false;
        NT_CHECK(OnModification(&m_virginityContext, &needBreak));
        NT_CHECK( Drv_GetNextModification(&m_virginityContext,
                                            &pStart,
                                            &size));
    }
    return STATUS_SUCCESS;
}
For example, the code that cancels all changes of the NT executive system looks as follows:
virtual NTSTATUS OnModification(const Drv_VirginityContext2 * pContext,
                                bool * pNeedBreak)
{
    const char * pMappedSectionStart = Drv_GetMappedSectionStart( pContext );
    char * pMemorySectionStart = (char * )pContext->m_currentSectionInfo.m_sectionStart;
    // memcpy inside
    Drv_HookMemCpy(pContext->m_startOfModification + pMemorySectionStart,
                    pContext->m_startOfModification + pMappedSectionStart,
                    pContext->m_endOfModification - pContext->m_startOfModification);
    *pNeedBreak = false;
    return NT_OK;
}
I must say that a very interesting detail appeared here.
Program still shows the one byte difference on the clean system!
See:

Figure 5. The result of unhooker.exe stat work
Is it a bug?
No, it is not. The windbg u (Unassemble) command clearly shows that the difference really exists.
This is RtlPrefetchMemoryNonTemporal function from the loaded ntoskernel:
kd> u 0x82603000+FB9A*4
nt!RtlPrefetchMemoryNonTemporal:
82641e68 90               nop
82641e69 a1b4aa7282       mov    eax,[nt!KePrefetchNTAGranularity (8272aab4)]
82641e6e 0f184100         prefetchnta byte ptr [ecx]
82641e72 03c8             add     ecx,eax
82641e74 2bd0             sub     edx,eax
82641e76 77f6             ja   nt!RtlPrefetchMemoryNonTemporal+0x6 (82641e6e)
82641e78 c3               ret
82641e79 90               nop
This is it in the file:
kd> u 0x00050800+FB9A*4
0008f668 c3               ret
0008f669 a1b4aa7282       mov    eax,[nt!KePrefetchNTAGranularity (8272aab4)]
0008f66e 0f184100         prefetchnta byte ptr [ecx]
0008f672 03c8             add     ecx,eax
0008f674 2bd0             sub     edx,eax
0008f676 77f6             ja      0008f66e
0008f678 c3               ret
0008f679 90               nop
As we can see, two functions differ only in the first byte. Why did this byte change?
After some research I found out, that the NT boot loader (http://en.wikipedia.org/wiki/NTLDR) transfers its knowledge about the CPU processor properties to the executing system in such way. It performs something like this:
*(char*)GetProcAddr(pNtosLoaded, "RtlPrefetchMemoryNonTemporal") = 0x90if the processor has all necessary characteristics for this function execution.
Using this information, we have to change the final version of the ScanAllModule procedure. Now, it just skips a 1-byte change if it is in the beginning of the RtlPrefetchMemoryNonTemporal function:
virtual NTSTATUS ScanAllModule()
{
    void * pStart = 0;
    int size = 0;
    NT_CHECK(Drv_GetFirstModification(&m_virginityContext,
                        &pStart,
                        &size));
    while(pStart)
    {
        bool needBreak = false;
        // check for RtlPrefetchMemoryNonTemporal
        bool bSkip = false;
        {
            char * pMemorySectionStart =
                  (char * )m_virginityContext.m_currentSectionInfo.m_sectionStart;
            if (m_virginityContext.m_startOfModification + pMemorySectionStart ==
                m_pRtlPrefetchMemoryNonTemporal  &&
                m_virginityContext.m_endOfModification - m_virginityContext.m_startOfModification
   == 1)
            {
                // skip it
                bSkip = true;
            }
        }
        if (!bSkip)
        {
            NT_CHECK(OnModification(&m_virginityContext, &needBreak));
        }
        NT_CHECK( Drv_GetNextModification(&m_virginityContext,
                                            &pStart,
                                            &size));
    }
    return STATUS_SUCCESS;
}
The m_pRtlPrefetchMemoryNonTemporal variable contains the name of the function:
UNICODE_STRING fncName;
    RtlInitUnicodeString(&fncName, L"RtlPrefetchMemoryNonTemporal");
    m_pRtlPrefetchMemoryNonTemporal = MmGetSystemRoutineAddress(&fncName);
This solution is not good enough for production code, and it would be better to think about something more universal, but it is quite appropriate for this article.
Demonstration
Now, we will show the work of the developed driver.
Here are the results of its work on a clean system:
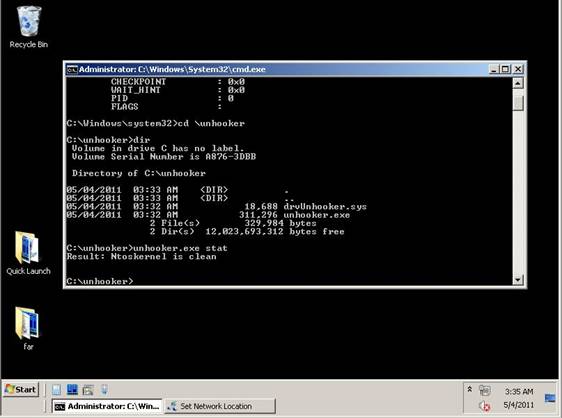
Figure 6. The results of unhooker.exe stat work on a clean system.
And now it’s time to fight with the the driver from the Hide Processes and Files. Second Edition: Splicing article! Let’s deploy it and hide all processes named calc.exe:
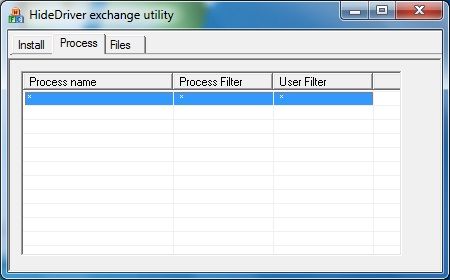
Figure 7. Result of Splicing Driver work – hidden calc.exe processes
To demonstrate all possibilities, I added all the functionality to the old driver and updated the unhooker.exe console utility. Its syntax did not change from the last article: utility can be started without parameters; in this case, it shows information about its abilities:
- “stat” command shows statistics about SST hooking and kernel patching;
- “unhook” command cleans ntoskrnl.
Let’s try to diagnose the system with the help of the unhook stat:
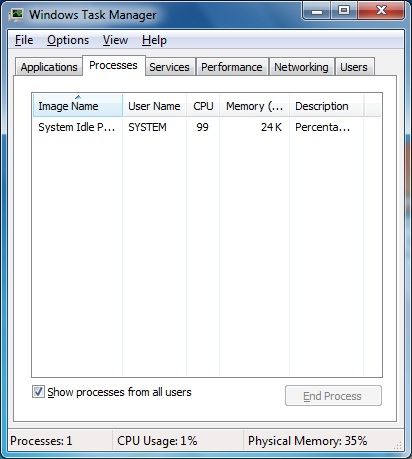
Figure 8. Resalts of the unhooker stat work in the infected system.
As we can see, together with the information about the SST changing, the information about the changed module is also returned. Let’s try to remove all the hooks:
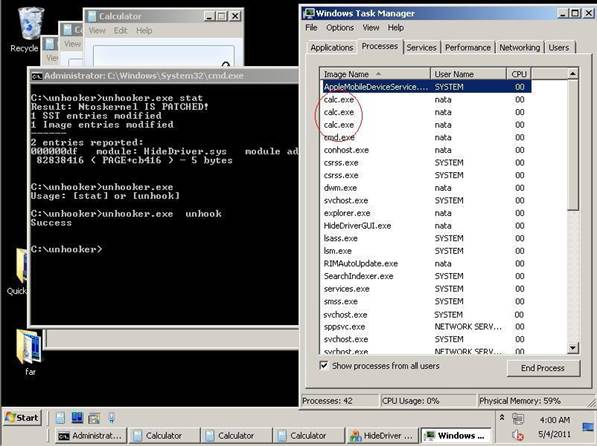
Figure 9. Result of the unhooker unhook work on the infected system.
Hurrah! The calc.exe processes are visible again and it means that we succeeded.
How to build
Steps are the same as in the previous article.
Thank you for your attention!


